[**Claude Code**](https://github.com/anthropics/claude-code) is Anthropic's official terminal-native coding agent powered by Claude.
## Install Claude Code
You can skip this section when using the one-click setup wizard below. If it cannot find the `claude` command, it offers to run the official Claude Code installer.
Refer to the [Claude Code documentation](https://code.claude.com/docs/en/setup) for installation.
## Configure MiniMax API
[**Codex**](https://developers.openai.com/codex/) is OpenAI's official AI coding agent for the desktop.
## Install Codex
You can skip Codex CLI installation when using the one-click setup wizard below. If it cannot find the `codex` command, it offers to install the official `@openai/codex` npm package.
Download and install the Codex desktop app from the [OpenAI Codex page](https://developers.openai.com/codex/).
## Configure MiniMax API
[**Cursor**](https://cursor.com) is Anysphere's AI-first IDE forked from VS Code, with built-in agents and codebase understanding.
## Install Cursor
1. Download and install Cursor from the [Cursor website](https://cursor.com/agents).
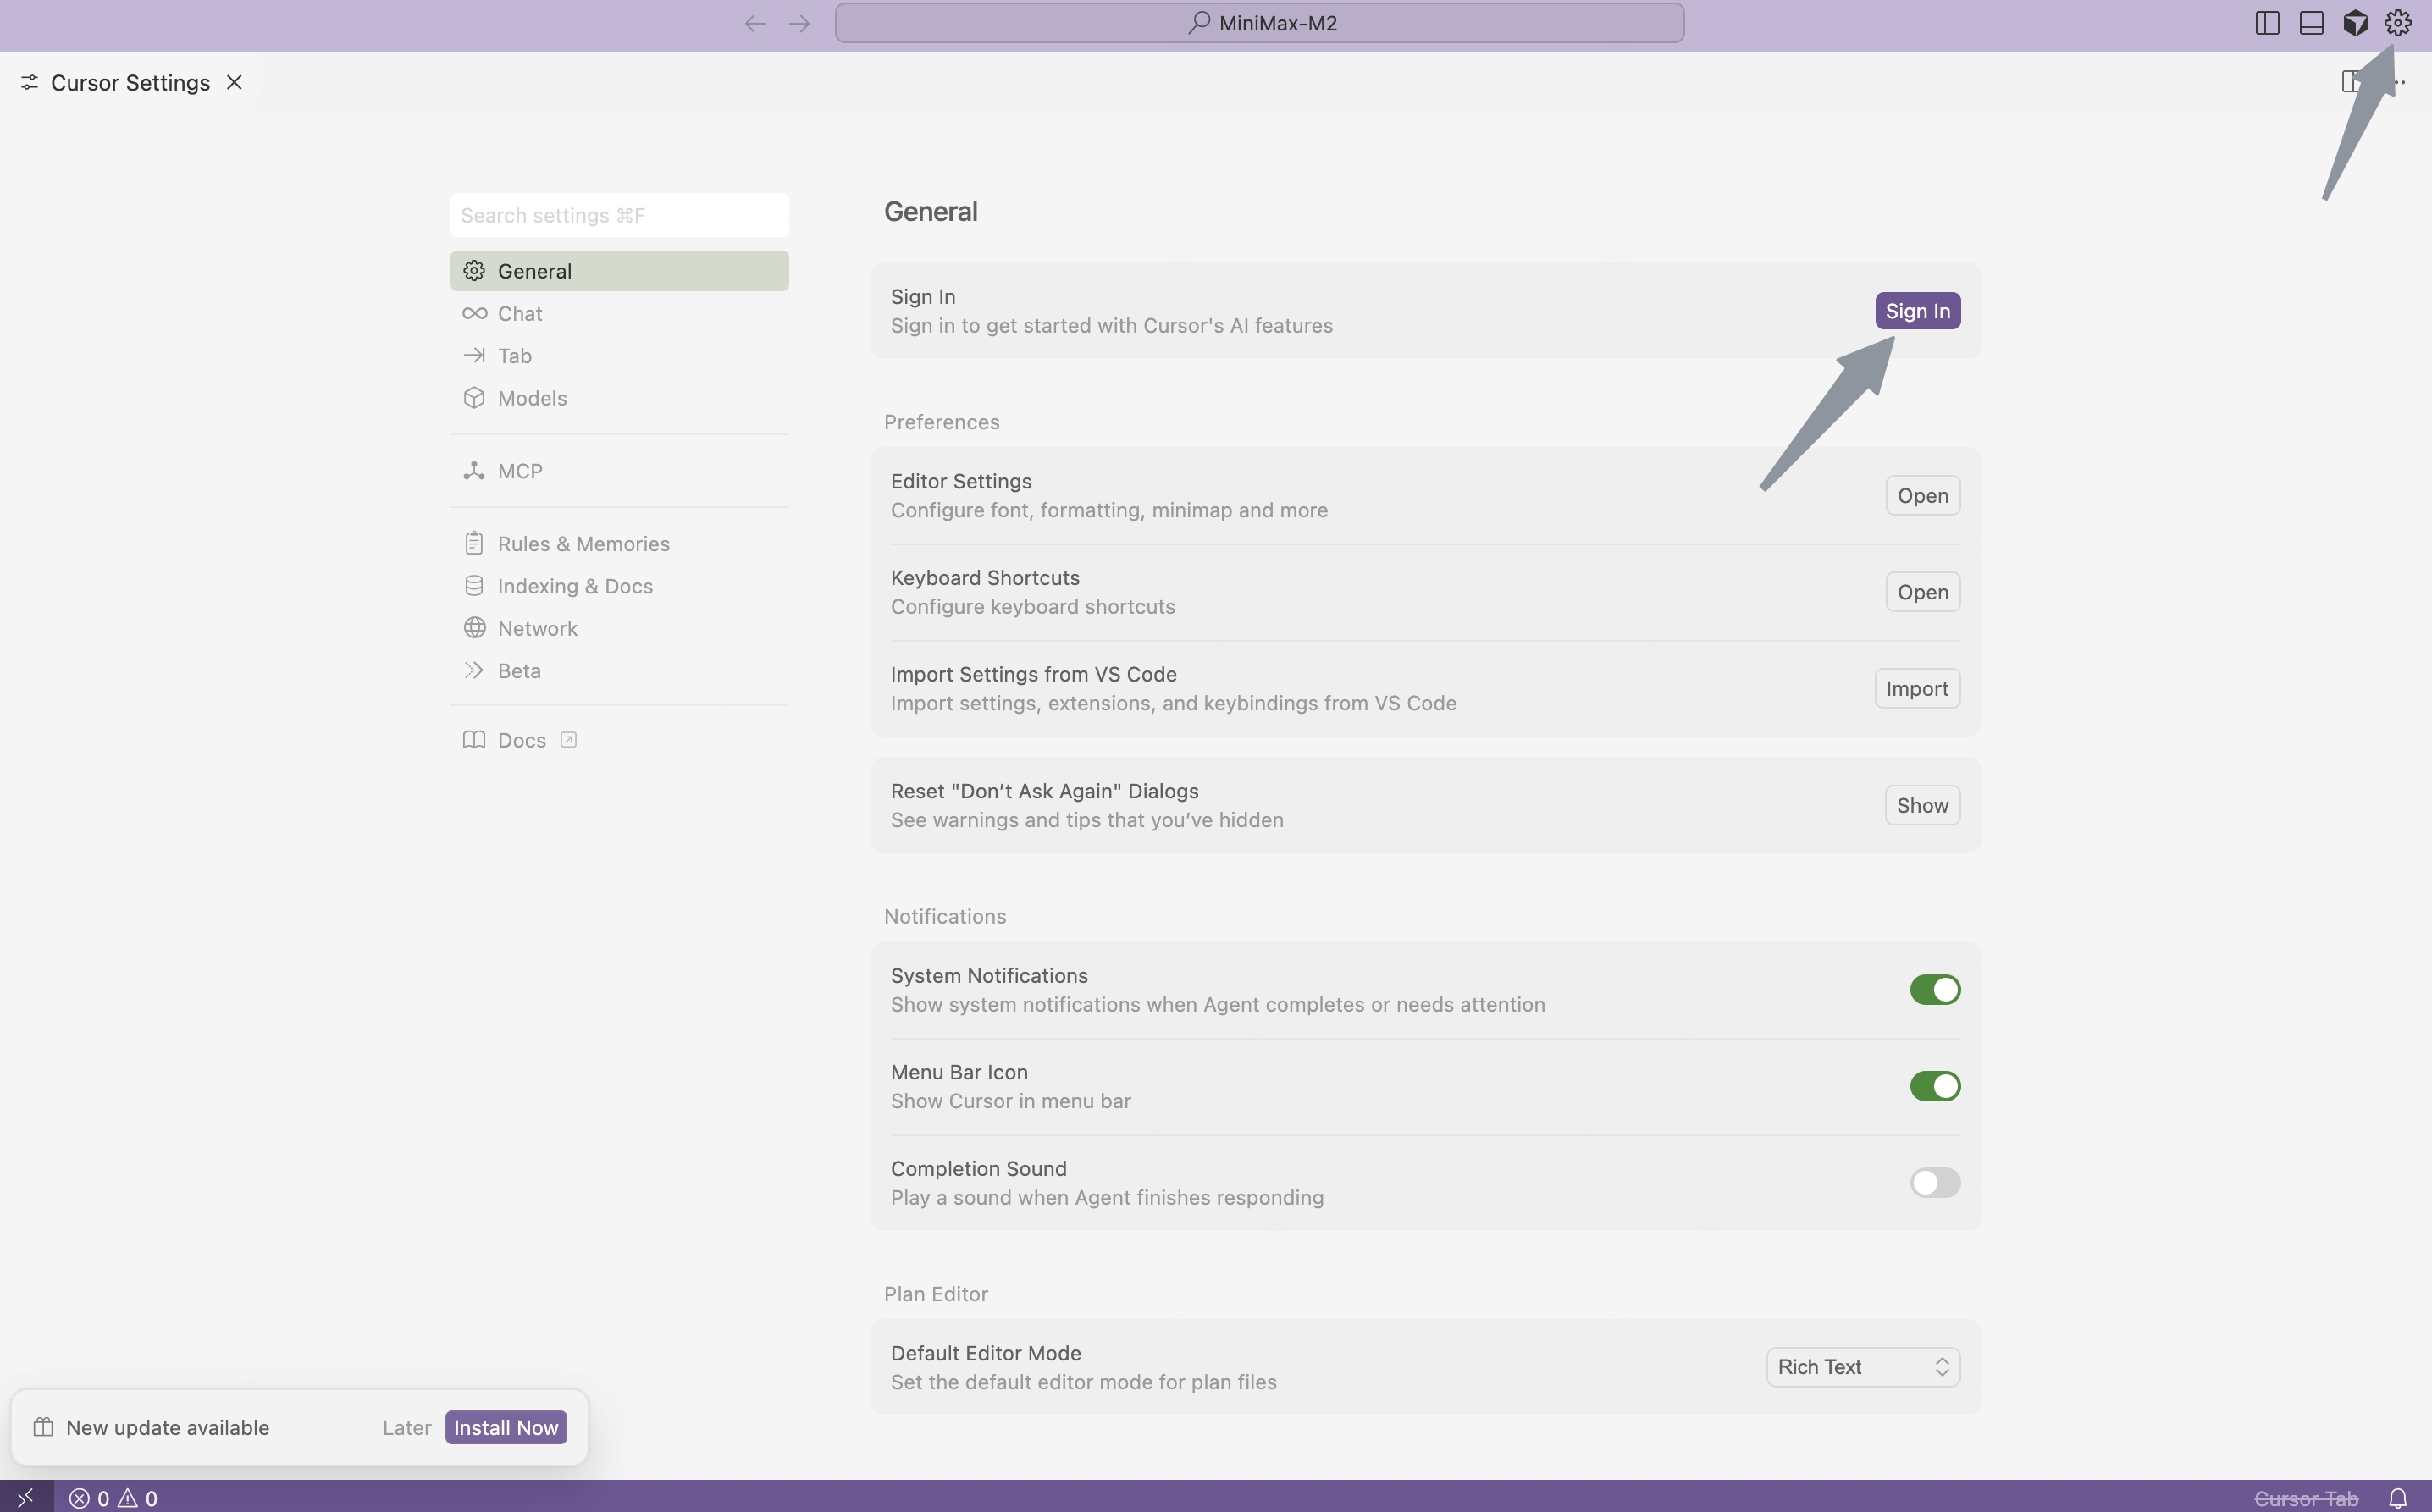
2. Open Cursor, click the **"Settings"** button in the top-right corner to enter the settings page.
3. Click the **"Sign in"** button to log in to your Cursor account.
## Configure MiniMax API
' \
--header 'Content-Type: application/json'
```
The usage bar is the primary way to understand your remaining quota. Typical usage patterns are:
* **Low consumption**: Daily chat, translation, and simple writing.
* **Medium consumption**: Code generation and multi-turn conversations.
* **Higher consumption**: Long-context reasoning, multimodal tasks, and complex agent workflows.
***
## How is usage reset?
Token Plan usage is shown through the console usage bar and controlled by quota windows:
* **Included Token Plan quota**: Controlled by a 5-hour rolling window and a weekly window.
* **Subscription cycle**: Unused included Token Plan quota does not carry over to the next billing cycle.
***
## What are migration compensation Credits?
Migration compensation Credits are a transition grant for some users moved from legacy Token Plan behavior to the current usage-based quota model. They are intended to make the transition smoother while users adapt to the new quota windows.
Compensation Credits can cover eligible Token Plan resource usage and have their own validity period. The exact amount, validity, and eligibility are shown in the console.
For annual subscriptions, eligible compensation Credits may be issued along with the remaining subscription cycles; each grant has its own validity period.
***
## What happens to my legacy plan after the upgrade?
Paid-cycle benefits remain available. Active legacy plans are either kept or migrated to the corresponding current tier according to the plan type. The Subscription Management page is the source of truth for your current plan status.
Notes:
* Some retired tiers are available only to existing users and cannot be subscribed to again after cancellation.
* Retired tiers continue under the migration rules during the current subscription period, then move to the corresponding current tier as shown in the console.
* Annual-plan users keep paid-month benefits; any compensation Credits follow the validity period shown in the console.
***
## What happens when I reach the usage limit?
**When reaching the 5-hour or weekly quota:**
* Use purchased Credits \
If purchased Credits are available, usage within Token Plan resource coverage can be automatically covered by purchased Credits.
* Upgrade your subscription \
You can visit the [Token Plan](https://platform.minimax.io/subscribe/token-plan) page to upgrade to a higher-tier plan for more request quota. Token Plan supports upgrading at any time, and upgrades take effect immediately.
* Switch to pay-as-you-go \
If you wish to continue without rate limits, you can replace your Subscription Key with your standard MiniMax Open Platform API Key from the account management system. This will switch the tool to a pay-as-you-go model based on actual token usage, which will consume your Open Platform account balance.
* Wait for the quota window to reset \
Included Token Plan quota is controlled by 5-hour rolling and weekly windows. Unused included quota does not carry over to the next billing cycle.
***
## Can the Subscription Key and the standard Open Platform API Key be used interchangeably?
No, they cannot.
* **Subscription Key:** Is used for Token Plan subscriptions and purchased Credits. Pay-as-you-go-priced API endpoints deduct from the included Token Plan quota according to the corresponding endpoint pricing. Purchased Credits have the same resource coverage as Token Plan and can cover eligible overflow beyond subscription quota.
* **Other Open Platform API Keys:** Are used for pay-as-you-go access to standard Open Platform API endpoints. Billing is based on actual token consumption and depletes your account balance.
***
## How does API-vlm work with Token Plan?
API-vlm supports multimodal understanding for image inputs. Its output is text.
When called with Token Plan, API-vlm deducts from the included Token Plan quota according to its pay-as-you-go price. If the included quota is exhausted and purchased Credits are available, additional usage can be automatically covered by purchased Credits.
***
## Can I use my subscription in multiple tools at the same time?
Yes. You can use the same subscription in all supported tools, but the quota is shared. Usage from all tools consumes the same included Token Plan quota.
***
## How do I cancel auto-renewal?
You can cancel auto-renewal on the Subscription Management page. Before canceling, note:
* Included Token Plan quota already issued for the current period remains usable within its validity period.
* Any migration compensation Credits you have received remain usable within their validity period.
* Some retired tiers are available only to existing users and cannot be subscribed to again after cancellation.
***
## How is TPS (Tokens Per Second) calculated for LLMs?
TPS measures the number of tokens generated per second, and is used to evaluate the inference output speed of a model. The formula is:
$$
\text{TPS} = \frac{\text{Number of output tokens}}{\text{Time of last token} - \text{Time of first token}}
$$
In other words, timing starts when the model outputs the first token and ends when the last token is generated. The total number of tokens produced is then divided by that elapsed time (in seconds).
TPS may fluctuate during actual usage. The TPS values indicated on each model page are reference values.
***
## What are the limits of the Token Plan? Is it suitable for production?
The Token Plan is designed for individual, interactive developer use, with higher-tier plans offering increased quotas. It is recommended to use pay-as-you-go for production use. Key limits include:
* **Rate limits (RPM / TPM)**: Requests may be throttled when exceeded; typically reset within \~1 minute and may tighten during peak traffic.
* **Included Token Plan quota**: 5-hour rolling and weekly quota windows.
***
## What are the platform traffic rules?
To ensure service stability and availability for all users, the MiniMax platform may implement dynamic rate limiting during peak hours. The details are as follows:
We have observed that some requests come from ultra-high-concurrency automated batch tasks or multi-user sharing patterns. To prevent a small number of abnormal traffic from occupying public computing resources and to ensure a stable experience for the majority of users, we will implement rate control based on account usage dimensions to ensure fair distribution of computing resources.
**Platform Rate Limiting Rules**
Consistent with industry practices, MiniMax will implement dynamic rate limiting during peak hours:
* **Peak Traffic Hours**: Dynamically adjusted based on cluster load, typically occurring on weekdays from 15:00-17:30:
* Plus: Supports approximately 3-4 agents
* Max: Supports approximately 4-5 agents
* Ultra: Supports approximately 6-7 agents
* **Included Token Plan quota**: Controlled by 5-hour rolling and weekly windows. Unused included quota does not carry over to the next billing cycle.
At the same time, we are continuously advancing computing capacity expansion and system optimization to provide you with more stable and reliable services. Thank you for your understanding and support!
***
## Token Plan Friend Referral Program Invitee Benefits (Exclusive Builder Benefits)
* **Token Plan Subscription Discount**: Subscribe to Token Plan through an invitation link and enjoy a 10% discount at checkout.
* **Applicable Plans**: Applicable to all Token Plan subscription plans and subscription upgrades.
* **Multiple Purchases**: Multiple purchases are supported during the campaign period, and invitees can enjoy the corresponding discount.
* **Builder Status**: Invited users can join the MiniMax Developer Community as community Builders and participate in discussions. They may have priority access to new MiniMax models, quickly obtain real-world development cases, and join discussions on cutting-edge technologies.
## Token Plan Friend Referral Program Inviter Rewards (Builder Rewards)
* **Open Platform Usage Incentive (Credits)**: For each successfully invited friend who completes an eligible paid order, the inviter will receive MiniMax Open Platform credits equal to 10% of the amount actually paid for that order.
* **Validity**: Credits are valid for 90 days from the date of issuance.
* **Usage**: Credits can only be used to offset API usage fees on the MiniMax Open Platform.
* **Other Restrictions**: Credits cannot be withdrawn or transferred and will automatically expire after the validity period.
## Token Plan Friend Referral Program Important Notes
**Refund Policy**: Token Plan is a subscription-based product and does not support refunds. If an invitee initiates a fraudulent refund for an order under this campaign, the platform will automatically revoke the reward credits associated with that order. The corresponding credits will appear as “Expired” in the credit records.
***
# Hermes Agent
Source: https://platform.minimax.io/docs/token-plan/hermes-agent
Use the latest MiniMax M-series models in Hermes Agent for autonomous AI-powered development.
[**Hermes Agent**](https://github.com/NousResearch/hermes-agent) is an open-source self-improving AI agent framework by Nous Research.
## Prerequisites
* A MiniMax [Subscription Key](https://platform.minimax.io/user-center/payment/token-plan) with Token Plan or Credits access
* A computer with terminal access (macOS, Linux, or Windows with WSL2)
***
![Hermes Agent]() ## Install Hermes Agent
[Hermes Agent](https://github.com/NousResearch/hermes-agent) is an open-source, self-improving AI agent built by [Nous Research](https://nousresearch.com). It features persistent cross-session memory, a built-in learning loop, 40+ integrated tools, and multi-platform access (CLI, Telegram, Discord, Slack, WhatsApp).
Run the one-line installer in your terminal:
```bash theme={null}
curl -fsSL https://raw.githubusercontent.com/NousResearch/hermes-agent/main/scripts/install.sh | bash
```
Verify the installation:
```bash theme={null}
hermes doctor
```
For more information, refer to the [Hermes Agent documentation](https://hermes-agent.nousresearch.com/docs/).
## Configure MiniMax Token Plan
When using the one-click setup wizard, you can skip the manual installation above and run:
```bash theme={null}
npx -y mmx-cli@latest agent setup
```
Select **Hermes Agent**. If it is missing, keep Hermes Agent selected in the second multi-select. The wizard runs the official installer's non-interactive core CLI stages, skips optional flows such as `setup` and `gateway`, and checks `hermes --version`. It then updates `~/.hermes/config.yaml` and `~/.hermes/.env`.
See [One-click setup wizard](/docs/token-plan/agent-setup) for command options and backup behavior.
Hermes Agent has built-in support for MiniMax as a provider. Run the model selector:
```bash theme={null}
hermes model
```
1. Select **"MiniMax (global endpoint)"** from the provider list.
## Install Hermes Agent
[Hermes Agent](https://github.com/NousResearch/hermes-agent) is an open-source, self-improving AI agent built by [Nous Research](https://nousresearch.com). It features persistent cross-session memory, a built-in learning loop, 40+ integrated tools, and multi-platform access (CLI, Telegram, Discord, Slack, WhatsApp).
Run the one-line installer in your terminal:
```bash theme={null}
curl -fsSL https://raw.githubusercontent.com/NousResearch/hermes-agent/main/scripts/install.sh | bash
```
Verify the installation:
```bash theme={null}
hermes doctor
```
For more information, refer to the [Hermes Agent documentation](https://hermes-agent.nousresearch.com/docs/).
## Configure MiniMax Token Plan
When using the one-click setup wizard, you can skip the manual installation above and run:
```bash theme={null}
npx -y mmx-cli@latest agent setup
```
Select **Hermes Agent**. If it is missing, keep Hermes Agent selected in the second multi-select. The wizard runs the official installer's non-interactive core CLI stages, skips optional flows such as `setup` and `gateway`, and checks `hermes --version`. It then updates `~/.hermes/config.yaml` and `~/.hermes/.env`.
See [One-click setup wizard](/docs/token-plan/agent-setup) for command options and backup behavior.
Hermes Agent has built-in support for MiniMax as a provider. Run the model selector:
```bash theme={null}
hermes model
```
1. Select **"MiniMax (global endpoint)"** from the provider list.
![Select MiniMax (global endpoint)]() 2. When prompted, enter your **Subscription Key** obtained from the [MiniMax Token Plan page](https://platform.minimax.io/user-center/payment/token-plan).
2. When prompted, enter your **Subscription Key** obtained from the [MiniMax Token Plan page](https://platform.minimax.io/user-center/payment/token-plan).
![Enter MiniMax API Key]() 3. Select **MiniMax-M3** as the model.
Don't have resources yet? View your Subscription Key on the [Token Plan page](https://platform.minimax.io/user-center/payment/token-plan), then buy a Token Plan subscription or Credits, or use resources assigned by your Team. Subscription Keys are different from pay-as-you-go API Keys.
## Start Using Hermes Agent
Run `hermes` to start talking with Hermes Agent powered by the latest MiniMax M-series models.
Hermes Agent's persistent memory and self-improving skills system means it gets better the more you use it — your coding patterns, project context, and preferences are remembered across sessions automatically.
## Toggle thinking
Toggle thinking at runtime with `/reasoning`: `none` turns it off, any other level (minimal/low/medium/high/xhigh) turns it on.
# Token Plan Overview
Source: https://platform.minimax.io/docs/token-plan/intro
Token Plan subscription and usage overview
3. Select **MiniMax-M3** as the model.
Don't have resources yet? View your Subscription Key on the [Token Plan page](https://platform.minimax.io/user-center/payment/token-plan), then buy a Token Plan subscription or Credits, or use resources assigned by your Team. Subscription Keys are different from pay-as-you-go API Keys.
## Start Using Hermes Agent
Run `hermes` to start talking with Hermes Agent powered by the latest MiniMax M-series models.
Hermes Agent's persistent memory and self-improving skills system means it gets better the more you use it — your coding patterns, project context, and preferences are remembered across sessions automatically.
## Toggle thinking
Toggle thinking at runtime with `/reasoning`: `none` turns it off, any other level (minimal/low/medium/high/xhigh) turns it on.
# Token Plan Overview
Source: https://platform.minimax.io/docs/token-plan/intro
Token Plan subscription and usage overview
![Token Plan]() ## Welcome to the Token Plan!
MiniMax is one of the few AI labs that develops frontier models across the full spectrum of modalities: language, speech, video, and image. The [Token Plan](https://platform.minimax.io/subscribe/token-plan) extends upon our former Coding Plan by providing included Token Plan usage beyond language models, allowing more creative agents and applications to be built and used.
## Core Advantages
One subscription covers eligible MiniMax resources through a shared usage bar.
Plans are designed for long-context agent, coding, and multimodal workflows.
A flat subscription fee includes broad resource coverage while keeping usage predictable.
## Subscription Key
Each user has a dedicated **Subscription Key** for each Team they belong to. This key can exist before the Team has purchased Token Plan seats or Credits. If no resources are available to the user, the key has no usable paid resources. Once a Token Plan seat is assigned, or Credits access is available, the same Subscription Key can use those resources.
For subscription and Credits rules, see [Token Plan pricing](/docs/guides/pricing-token-plan). For team usage, see [Token Plan for Teams](/docs/guides/pricing-token-plan-team).
## Usage Quota
The [Token Plan](https://platform.minimax.io/subscribe/token-plan) usage quota is shown as a usage bar in the console. For API endpoints that have pay-as-you-go pricing, usage deducts from the included Token Plan quota according to the corresponding endpoint pricing.
| | **Plus** | **Max** | **Ultra** |
| :---------------- | :-------------------------------- | :------------------------------------------- | :------------------------------------------ |
| **Price** | **\$22 /month** | **\$55 /month** | **\$132 /month** |
| **Best for** | Personal projects and prototyping | Daily coding with agents and multimodal work | Heavy Agent workflows and extended sessions |
| **Quota windows** | 5-hour rolling and weekly windows | 5-hour rolling and weekly windows | 5-hour rolling and weekly windows |
| **Agent usage** | 3-4 agents | 4-5 agents | 6-7 agents |
## Welcome to the Token Plan!
MiniMax is one of the few AI labs that develops frontier models across the full spectrum of modalities: language, speech, video, and image. The [Token Plan](https://platform.minimax.io/subscribe/token-plan) extends upon our former Coding Plan by providing included Token Plan usage beyond language models, allowing more creative agents and applications to be built and used.
## Core Advantages
One subscription covers eligible MiniMax resources through a shared usage bar.
Plans are designed for long-context agent, coding, and multimodal workflows.
A flat subscription fee includes broad resource coverage while keeping usage predictable.
## Subscription Key
Each user has a dedicated **Subscription Key** for each Team they belong to. This key can exist before the Team has purchased Token Plan seats or Credits. If no resources are available to the user, the key has no usable paid resources. Once a Token Plan seat is assigned, or Credits access is available, the same Subscription Key can use those resources.
For subscription and Credits rules, see [Token Plan pricing](/docs/guides/pricing-token-plan). For team usage, see [Token Plan for Teams](/docs/guides/pricing-token-plan-team).
## Usage Quota
The [Token Plan](https://platform.minimax.io/subscribe/token-plan) usage quota is shown as a usage bar in the console. For API endpoints that have pay-as-you-go pricing, usage deducts from the included Token Plan quota according to the corresponding endpoint pricing.
| | **Plus** | **Max** | **Ultra** |
| :---------------- | :-------------------------------- | :------------------------------------------- | :------------------------------------------ |
| **Price** | **\$22 /month** | **\$55 /month** | **\$132 /month** |
| **Best for** | Personal projects and prototyping | Daily coding with agents and multimodal work | Heavy Agent workflows and extended sessions |
| **Quota windows** | 5-hour rolling and weekly windows | 5-hour rolling and weekly windows | 5-hour rolling and weekly windows |
| **Agent usage** | 3-4 agents | 4-5 agents | 6-7 agents |
Available model coverage includes the full MiniMax lineup (M3 / M2.7 / image / speech). A small number of special models (MiniMax H3, voice design, rapid voice cloning, etc.) are not currently supported. Credits usage is unrestricted.
To call supported multimodal resources with your Subscription Key, see the [MiniMax CLI guide](/docs/token-plan/minimax-cli).
## Getting Started
Visit the [Token Plan](https://platform.minimax.io/subscribe/token-plan) subscription page to buy an individual subscription or Credits in your Default Team, or join a Team where a Token Plan seat or shared Credits are available.
Navigate to [Account / Token Plan](https://platform.minimax.io/user-center/payment/token-plan) to view your available resources and get your **Subscription Key**.
**Important Notes**
* The Subscription Key is used for Token Plan subscriptions and purchased Credits.
* The Subscription Key is not interchangeable with pay-as-you-go API Keys.
* A Subscription Key can exist before any paid resource is available. It becomes usable when the user has a Token Plan seat or Credits access.
* Please protect your API Key to prevent any loss of resources.
## Use in AI Agents and Coding Tools
Pick your tool and follow the integration guide:
For other tools, see [Other Tools](/docs/token-plan/other-tools).
## After Reaching the Usage Limit
When you reach the 5-hour rolling quota or weekly quota, you have the following options:
1. **Use purchased Credits**: If purchased Credits are available, usage within Token Plan resource coverage can be automatically covered by purchased Credits.
2. **Upgrade or get another assignment**: Upgrade your subscription, or ask the Team Owner or Admin to assign a higher available plan.
3. **Switch to Pay-As-You-Go**: If you wish to continue without rate limits, you can replace your Subscription Key with your [pay-as-you-go API Key](https://platform.minimax.io/user-center/basic-information/interface-key). This will switch the tool to a pay-as-you-go model based on actual token usage, which will consume your API account balance.
4. **Wait for the quota window to reset**: The included Token Plan quota uses 5-hour rolling and weekly windows. Unused subscription quota does not carry over to the next billing cycle.
## Next Steps
Run your first MiniMax API call in 5 minutes.
Common questions on quotas, billing, switching, refunds.
# Web Search MCP
Source: https://platform.minimax.io/docs/token-plan/mcp-guide
**Token Plan MCP** provides the **web_search** tool, helping developers quickly access information during coding.
We recommend using [MiniMax CLI](/docs/token-plan/minimax-cli) instead of MCP for simpler setup and better experience.
## Tool Description
Performs web searches based on search queries, returning search results and related suggestions.
| Parameter | Type | Required | Description |
| :-------- | :----- | :------: | :----------- |
| query | string | ✓ | Search query |
## Prerequisites
Visit [Billing > Token Plan](https://platform.minimax.io/user-center/payment/token-plan) to view your Subscription Key. The key needs a Token Plan seat or purchased Credits access to use paid resources.
```bash theme={null}
curl -LsSf https://astral.sh/uv/install.sh | sh
```
```powershell theme={null}
powershell -ExecutionPolicy ByPass -c "irm https://astral.sh/uv/install.ps1 | iex"
```
For other installation methods, refer to the [uv repository](https://github.com/astral-sh/uv).
```bash theme={null}
which uvx
```
```powershell theme={null}
(Get-Command uvx).source
```
If installed correctly, a path will be shown (e.g., `/usr/local/bin/uvx`). If you get `spawn uvx ENOENT` error, you need to configure the absolute path.
## Use in Claude Code
Download and install Claude Code from [Claude Code official website](https://www.claude.com/product/claude-code)
Run the following command in terminal, replace `api_key` with your API Key:
```bash theme={null}
claude mcp add -s user MiniMax --env MINIMAX_API_KEY=api_key --env MINIMAX_API_HOST=https://api.minimax.io -- uvx minimax-coding-plan-mcp
```
Edit the config file `~/.claude.json`, add the following MCP configuration:
```json theme={null}
{
"mcpServers": {
"MiniMax": {
"command": "uvx",
"args": ["minimax-coding-plan-mcp"],
"env": {
"MINIMAX_API_KEY": "MINIMAX_API_KEY",
"MINIMAX_API_HOST": "https://api.minimax.io"
}
}
}
}
```
After entering Claude Code, type `/mcp`. If you can see `web_search`, the configuration is successful.
![]() If you use MCP in an IDE (like TRAE), you also need to configure MCP in the corresponding IDE settings
## Use in Cursor
Download and install Cursor from [Cursor official website](https://cursor.com/)
Open `Customize -> MCPs`, then click `New` to create an MCP server.
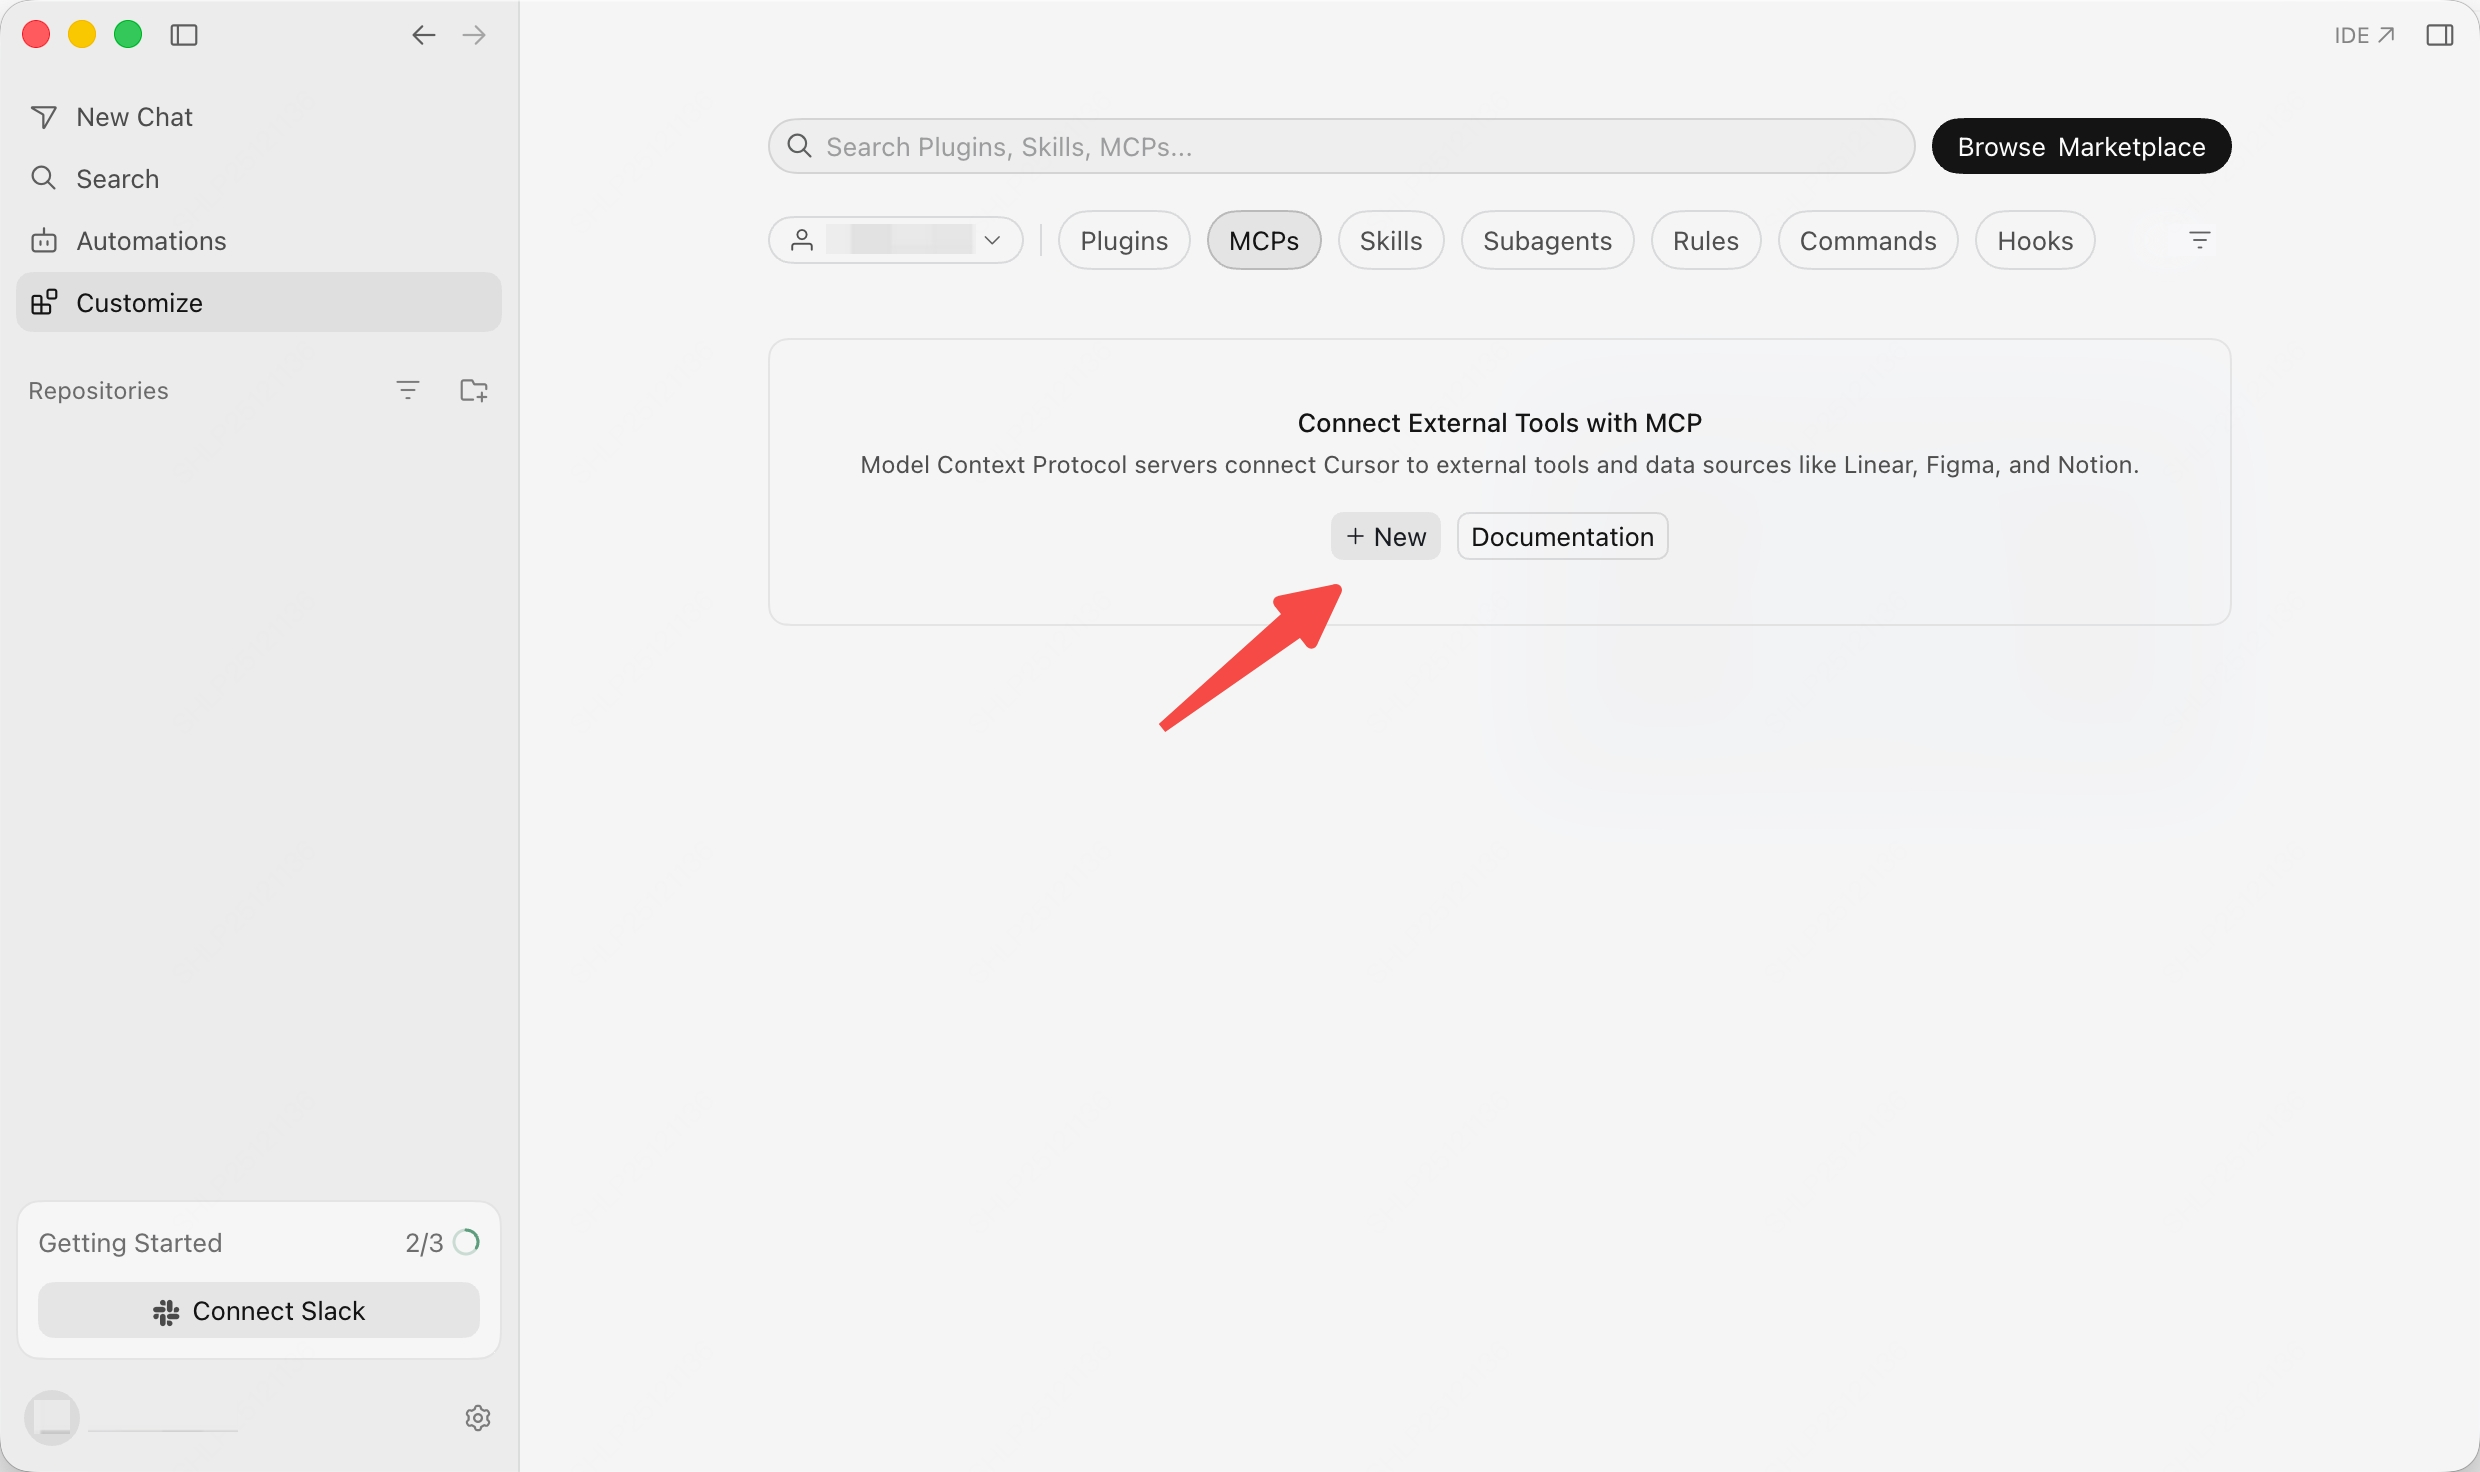
Add the following configuration to `mcp.json` file:
```json theme={null}
{
"mcpServers": {
"MiniMax": {
"command": "uvx",
"args": ["minimax-coding-plan-mcp"],
"env": {
"MINIMAX_API_KEY": "Enter your API Key",
"MINIMAX_API_HOST": "https://api.minimax.io"
}
}
}
}
```
## Use in OpenCode
Download and install OpenCode from [OpenCode official website](https://opencode.ai/)
Edit the config file `~/.config/opencode/opencode.json`, add the following MCP configuration:
```json theme={null}
{
"$schema": "https://opencode.ai/config.json",
"mcp": {
"MiniMax": {
"type": "local",
"command": ["uvx", "minimax-coding-plan-mcp"],
"environment": {
"MINIMAX_API_KEY": "MINIMAX_API_KEY",
"MINIMAX_API_HOST": "https://api.minimax.io"
},
"enabled": true
}
}
}
```
After entering OpenCode, type `/mcp`. If you can see `MiniMax connected`, the configuration is successful.
If you use MCP in an IDE (like TRAE), you also need to configure MCP in the corresponding IDE settings
## Use in Cursor
Download and install Cursor from [Cursor official website](https://cursor.com/)
Open `Customize -> MCPs`, then click `New` to create an MCP server.

Add the following configuration to `mcp.json` file:
```json theme={null}
{
"mcpServers": {
"MiniMax": {
"command": "uvx",
"args": ["minimax-coding-plan-mcp"],
"env": {
"MINIMAX_API_KEY": "Enter your API Key",
"MINIMAX_API_HOST": "https://api.minimax.io"
}
}
}
}
```
## Use in OpenCode
Download and install OpenCode from [OpenCode official website](https://opencode.ai/)
Edit the config file `~/.config/opencode/opencode.json`, add the following MCP configuration:
```json theme={null}
{
"$schema": "https://opencode.ai/config.json",
"mcp": {
"MiniMax": {
"type": "local",
"command": ["uvx", "minimax-coding-plan-mcp"],
"environment": {
"MINIMAX_API_KEY": "MINIMAX_API_KEY",
"MINIMAX_API_HOST": "https://api.minimax.io"
},
"enabled": true
}
}
}
```
After entering OpenCode, type `/mcp`. If you can see `MiniMax connected`, the configuration is successful.
![]() # Token Plan Migration Guide
Source: https://platform.minimax.io/docs/token-plan/migration
How existing Token Plan subscriptions migrate to the M3-era plans, with quota protection and compensation top-ups for retired tiers.
**Our commitment**: your existing M2.7 entitlements will not shrink, and you can now use M3 seamlessly on the same plan.
## 1. Plus / Max subscribers
Pricing is unchanged and your contracted price continues to apply. Under the new plan:
* **Plus \$20**: M2.7 5-hour usage **+8%** (no reduction)
* **Max \$50**: M2.7 5-hour usage stays the same as your existing tier
* New **M3 access** is included, sharing the same quota pool with M2.7
* New **multimodal entitlements** — image and speech can all be called from the same quota pool
**The switch happens automatically. No action required.**
## 2. Starter \$10 / Plus-hs \$40 (legacy tiers)
These two tiers are preserved with **the same pricing and contracted relationship**, but are **only available to existing subscribers** — they are no longer offered to new users after the new plan launches.
* M2.7 usage stays the same as your existing tier
* New M3 access and multimodal quota are included, sharing the same quota pool with M2.7
These two legacy tiers are reserved exclusively for existing subscribers. We recommend keeping your subscription active to retain these entitlements; if you change tiers or cancel your subscription, the related legacy entitlements are considered waived and will not be reissued if you subscribe again later.
The switch happens automatically. No action required.
## 3. Retired tiers (Max-hs \$80 / Ultra-hs \$150)
These two tiers are being retired. We are providing a migration path with **a lower monthly fee but no reduction in entitlements**:
* **Max-hs \$80 → new Max \$50**: monthly fee reduced by \$30, with an additional **\~\$60 of credits granted each month** to cover the difference, plus multimodal entitlements
* **Ultra-hs \$150 → new Ultra \$120**: monthly fee reduced by \$30, with an additional **\~\$60 of credits granted each month** to cover the difference, including 5 video generations per day
You will be moved to the new tier automatically on your next renewal date. You can also choose another tier or unsubscribe at your discretion.
## 4. Annual subscribers
Entitlement protection for already-paid months: **M2.7 usage will not shrink, and all multimodal entitlements are preserved**. The annual discount rate continues to apply.
**Retired-tier annual plans (Max-hs annual / Ultra-hs annual)**: the price-difference compensation is not paid out as a one-time grant. Instead, **equivalent credits are granted each month based on your subscription cycle** (each grant has its own 1-year validity and does not roll over), ensuring your entitlements are not reduced over the full year.
Examples:
* **Ultra-hs \$150/month annual plan (8 months remaining)**: each month, on your subscription anniversary, you switch to the new Ultra \$120 entitlements and receive an additional **\~\$60 of credits** (\$30 difference × 2) for 8 consecutive months until the annual plan ends. After the annual plan expires, it auto-renews at the new Ultra \$120 annual price, and the annual discount continues to apply.
* **Max-hs \$80/month annual plan (6 months remaining)**: each month, on your subscription anniversary, you switch to the new Max \$50 entitlements and receive an additional **\~\$60 of credits** (\$30 difference × 2) for 6 consecutive months.
## 5. New Ultra \$120 heavy-use tier
A new tier that fills the gap between \$80 and \$150, designed for heavy agentic users. It provides roughly 12.5B tokens of monthly capacity and includes 5 video generations per day.
## 6. Legacy subscriber entitlements
Previously promised entitlements for eligible legacy subscribers remain in effect. Specific entitlement details, scope, and real-time usage status are account-specific; please refer to your usage dashboard or entitlement details page in the console.
These entitlements are applied automatically based on system records. No application is required.
## 7. About credits
* **1,000 credits = \$1** (1:1 parity with API pay-as-you-go pricing, no markup)
* **Usable across most models on the MiniMax API Platform** (MiniMax H3 model capabilities are not supported), deducted in real time at each model's pay-as-you-go list price
* **Shared across modalities**: text, image, speech, and video (where the tier supports it) all draw from the same credit pool
***
For any future Token Plan or tier adjustments, we will communicate clearly with all subscribers in advance. Thank you for your continued trust and support.
— The MiniMax Token Plan team
# Mini-Agent
Source: https://platform.minimax.io/docs/token-plan/mini-agent
Mini-Agent is a minimalist yet professional project that demonstrates best practices for building Agents using MiniMax M3. The project is fully compatible with the Anthropic API and supports interleaved thinking, unlocking the model's powerful reasoning capabilities for long and complex tasks.
View GitHub Repository
## Core Features
* **Complete Agent Execution Loop**: A robust execution framework with built-in tools for file system and shell operations
* **Persistent Memory**: Through the built-in Session Note Tool, the Agent can retain key information across multiple sessions
* **Intelligent Context Management**: Automatically summarizes conversation history, handling configurable token limits for unlimited task lengths
* **Integrated Claude Skills**: 15 built-in professional skills covering document processing, design, testing, and development
* **Integrated MCP Tools**: Native support for MCP protocol, easily connecting to knowledge graphs, web search, and other tools
* **Comprehensive Logging**: Detailed logs for every request, response, and tool execution for easy debugging
* **Clean Design**: Beautiful command-line interface and easy-to-understand codebase, making it an ideal starting point for building advanced Agents
***
## Usage Examples
### Task Execution
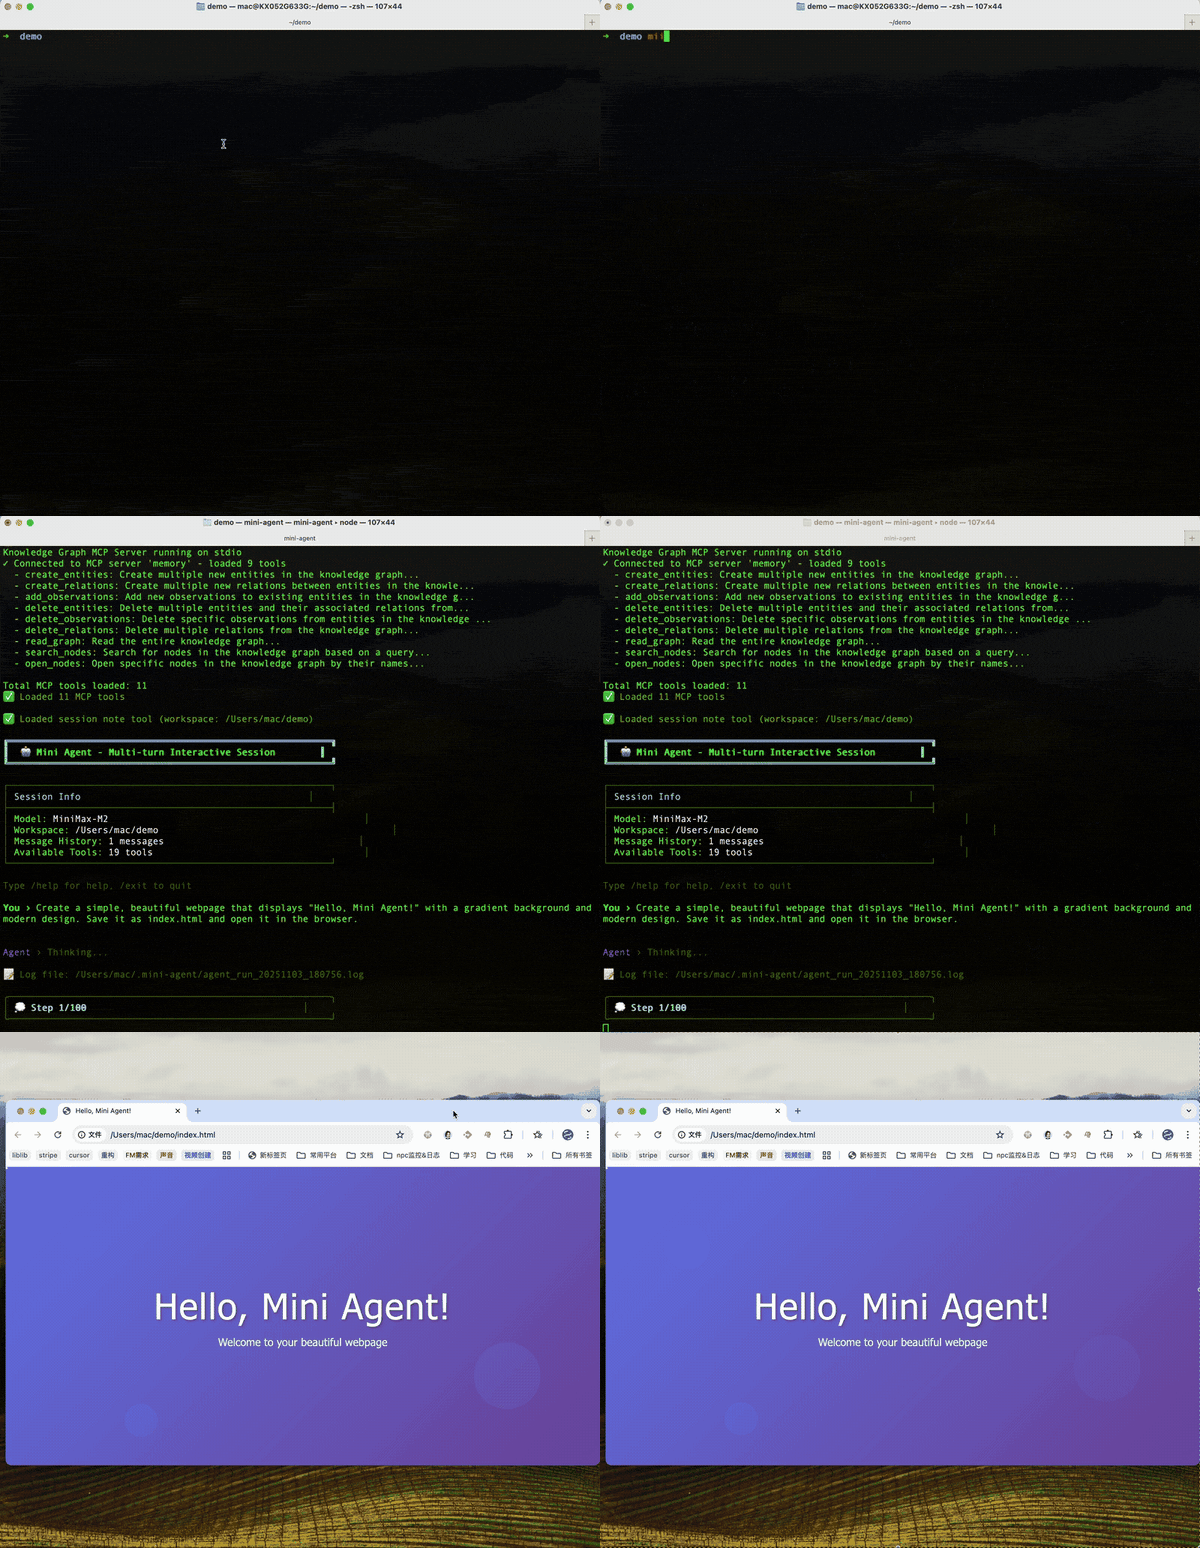
Ask the Agent to create a clean and beautiful webpage and display it in the browser, demonstrating the basic tool usage loop.
### Using Claude Skill (e.g., PDF Generation)
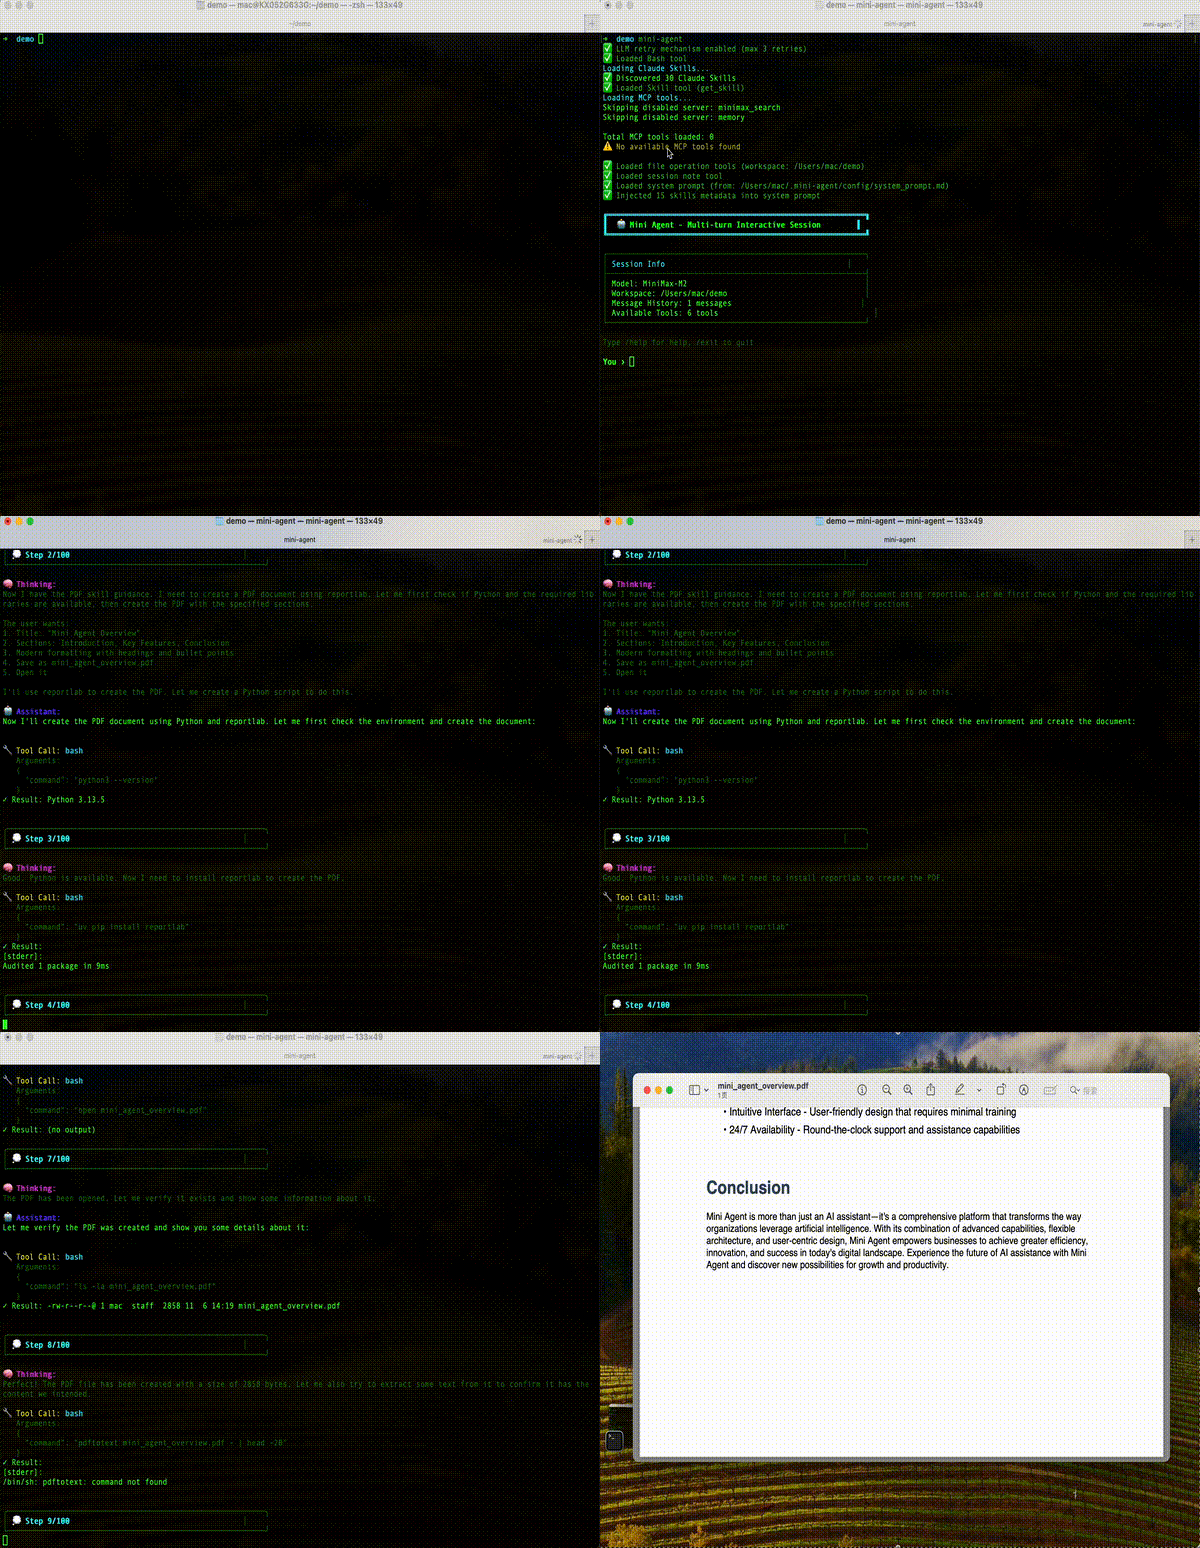
The Agent uses Claude Skill to create professional documents (such as PDF or DOCX) based on user requests, demonstrating its powerful advanced capabilities.
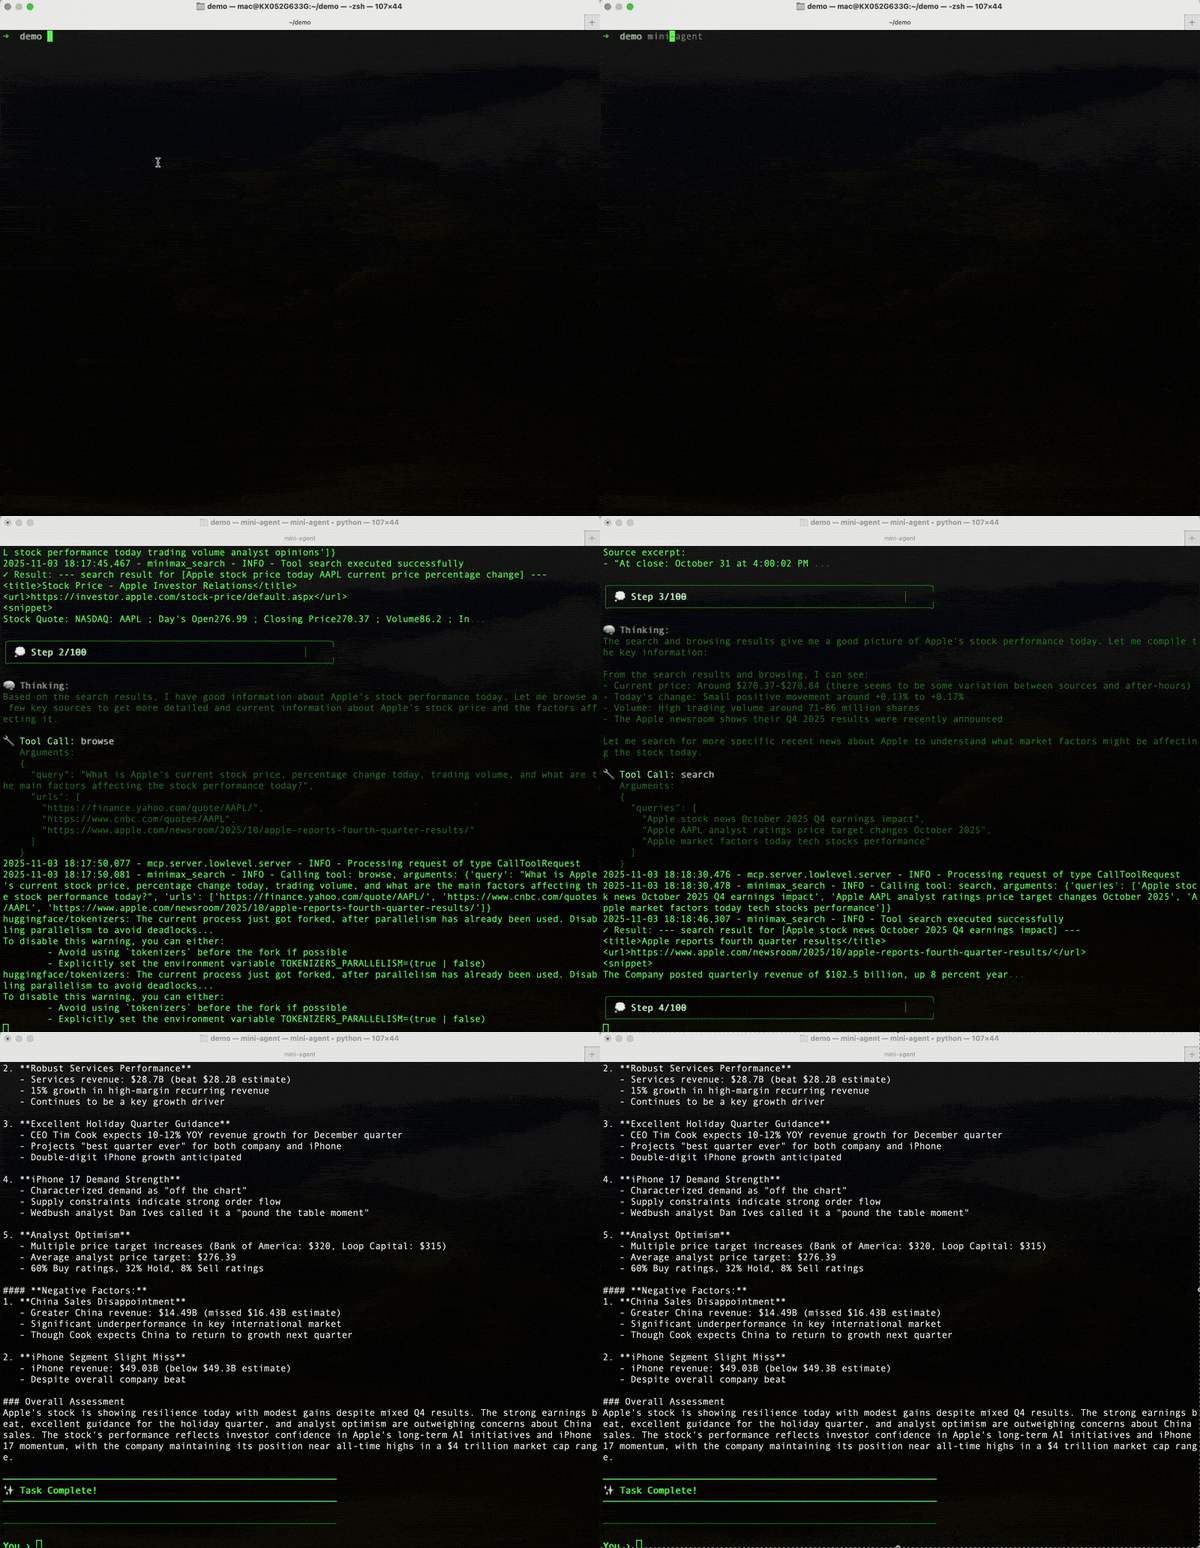
### Web Search and Summary (MCP Tool)
The Agent uses web search tools to find the latest information online and summarize it for the user.
***
## Quick Start
### 1. Install uv
```bash macOS/Linux/WSL theme={null}
curl -LsSf https://astral.sh/uv/install.sh | sh
# After installation, restart terminal or run:
source ~/.bashrc # or ~/.zshrc
```
```powershell Windows theme={null}
powershell -ExecutionPolicy ByPass -c "irm https://astral.sh/uv/install.ps1 | iex"
# Restart PowerShell after installation
```
### 2. Install Mini Agent
```bash theme={null}
uv tool install git+https://github.com/MiniMax-AI/Mini-Agent.git
```
### 3. Run Configuration Script
```bash macOS/Linux theme={null}
curl -fsSL https://raw.githubusercontent.com/MiniMax-AI/Mini-Agent/main/scripts/setup-config.sh | bash
```
```powershell Windows theme={null}
$r=Invoke-WebRequest -Uri "https://raw.githubusercontent.com/MiniMax-AI/Mini-Agent/main/scripts/setup-config.ps1" -UseBasicParsing;[IO.File]::WriteAllText("$env:TEMP\setup-config.ps1",$r.Content,(New-Object Text.UTF8Encoding $true));powershell -ExecutionPolicy Bypass -File "$env:TEMP\setup-config.ps1"
```
### 4. Configure API Key
The configuration script will create a config file in `~/.mini-agent/config/`. Edit this file:
```bash theme={null}
nano ~/.mini-agent/config/config.yaml
```
Enter your API Key and corresponding API Base:
```yaml theme={null}
api_key: "YOUR_API_KEY_HERE" # Enter your API Key
api_base: "https://api.minimax.io"
model: "MiniMax-M3"
```
### 5. Start Using
```bash theme={null}
mini-agent # Use current directory as workspace
mini-agent --workspace /path/to/your/project # Specify workspace directory
mini-agent --version # View version info
# Management commands
uv tool upgrade mini-agent # Upgrade to latest version
uv tool uninstall mini-agent # Uninstall tool
uv tool list # View all installed tools
```
***
## Development Mode
This mode is suitable for developers who need to modify code, add features, or debug.
**Installation and Configuration Steps:**
```bash theme={null}
# 1. Clone repository
git clone https://github.com/MiniMax-AI/Mini-Agent.git
cd Mini-Agent
# 2. Sync dependencies
uv sync
# 3. Initialize Claude Skills (optional)
git submodule update --init --recursive
# 4. Copy configuration template
cp mini_agent/config/config-example.yaml mini_agent/config/config.yaml
# 5. Edit configuration file
vim mini_agent/config/config.yaml
```
Enter your API Key and corresponding API Base:
```yaml theme={null}
api_key: "YOUR_API_KEY_HERE" # Enter your API Key
api_base: "https://api.minimax.io"
model: "MiniMax-M3"
max_steps: 100
workspace_dir: "./workspace"
```
**Running Methods:**
```bash theme={null}
# Method 1: Run as module directly (for debugging)
uv run python -m mini_agent.cli
# Method 2: Install in editable mode (recommended)
uv tool install -e .
mini-agent
mini-agent --workspace /path/to/your/project
```
For more development guidance, please refer to [Development Guide](https://github.com/MiniMax-AI/Mini-Agent/blob/main/docs/DEVELOPMENT_GUIDE_CN.md)
***
## ACP & Zed Editor Integration
Mini Agent supports Agent Communication Protocol (ACP) for integration with code editors like Zed.
**Setting up in Zed Editor:**
1. Install Mini Agent in development mode or tool mode
2. Add the following to your Zed `settings.json`:
```json theme={null}
{
"agent_servers": {
"mini-agent": {
"command": "/path/to/mini-agent-acp"
}
}
}
```
**Command Path:**
* If installed via `uv tool install`: use the output of `which mini-agent-acp`
* Development mode: `./mini_agent/acp/server.py`
**Usage:**
* Use `Ctrl+Shift+P` → "Agent: Toggle Panel" to open Zed's Agent panel
* Select "mini-agent" from the Agent dropdown
* Start chatting with Mini Agent directly in the editor
# MiniMax CLI
Source: https://platform.minimax.io/docs/token-plan/minimax-cli
[mmx-cli](https://github.com/MiniMax-AI/cli): one prompt to bring MiniMax into your AI agent
For Token Plan users, no coding is required to call MiniMax text, image, video, speech, vision, and web-search capabilities from agents such as OpenClaw and Claude Code. Availability depends on the current plan and CLI version.
If you still prefer direct API integration, see the [API Documentation](/docs/api-reference/api-overview).
### Install and configure the CLI
Copy the prompt below to your AI agent (OpenClaw, Claude Code, Cursor, MaxClaw, AutoClaw, KimiClaw, TRAE, OpenCode, etc.). It will guide you through installing the CLI, signing in, and adding the SKILL:
```text theme={null}
Please integrate MiniMax CLI (https://github.com/MiniMax-AI/cli) for me in three steps:
1. Install globally: run `npm install -g mmx-cli`, then verify with `mmx --version`
2. Sign in: run `mmx auth login --api-key sk-xxxxx` (replace sk-xxxxx with my actual key); the latest CLI auto-detects the service region from the API Key — if API calls return 401 later, fall back to `mmx config set --key region --value global|cn` to set it manually
3. Install the official SKILL (recommended, helps you call mmx more accurately afterwards): run `npx skills add MiniMax-AI/cli -y -g`
After that, run `mmx quota` to confirm my Token Plan balance.
```
Run the following command to install globally:
```bash theme={null}
npm install -g mmx-cli
```
Authenticate with your API Key (replace `sk-xxxxx` with your key):
```bash theme={null}
mmx auth login --api-key sk-xxxxx
```
The latest mmx-cli auto-detects the service region based on the API Key, so manual region configuration is usually unnecessary.
The service region depends on whether you purchased the API service from the mainland China platform (`cn`, [MiniMax China subscription](https://platform.minimaxi.com/subscribe/token-plan)) or the overseas platform (`global`, [MiniMax international subscription](https://platform.minimax.io/subscribe/token-plan)).
If your API calls return 401 after login, region detection likely failed. Set it manually:
```bash theme={null}
mmx config set --key region --value global # Overseas Service
mmx config set --key region --value cn # Mainland China Service
```
Run `mmx auth status` to confirm the active region matches the platform you purchased from.
If you want Claude Code, OpenClaw, Cursor, or other AI Agents to call mmx, install the official SKILL.md so the Agent can make better decisions and skip flipping through `--help`:
```bash theme={null}
npx skills add MiniMax-AI/cli -y -g
```
The SKILL is auto-symlinked into `~/.claude/skills/`, `~/.openclaw/skills/`, and similar Agent directories, and is recognized after the next Agent restart. **Skip this step if you only use mmx directly in the terminal.**
### Use the CLI
**Language**
`Use minimax to write a 4-line poem about AI`
***
**Video**
`Generate a video: at sunset, a cat sits by the window looking into the distance`
***
**Speech**
`Read in a gentle female voice: Welcome to MiniMax Token Plan. After subscribing, your AI agent can generate video, speech, and images with multimodal capability.`
***
**Image**
`Generate a cyberpunk city night scene in 16:9`
When no output option is specified, images are saved to the current working directory. Use `--out` for a single output path or `--out-dir` for batch output.
**Language**
`mmx text chat --message "Write a 4-line poem about AI"`
***
**Video**
`mmx video generate --prompt "At sunset, a cat sits by the window looking into the distance"`
***
**Speech**
`mmx speech synthesize --text "Welcome to MiniMax Token Plan. After subscribing, your AI agent can generate video, speech, and images with multimodal capability." --out voiceover.mp3`
***
**Image**
`mmx image "Cyberpunk city night scene, 16:9"`
### CLI Dashboard
# Token Plan Migration Guide
Source: https://platform.minimax.io/docs/token-plan/migration
How existing Token Plan subscriptions migrate to the M3-era plans, with quota protection and compensation top-ups for retired tiers.
**Our commitment**: your existing M2.7 entitlements will not shrink, and you can now use M3 seamlessly on the same plan.
## 1. Plus / Max subscribers
Pricing is unchanged and your contracted price continues to apply. Under the new plan:
* **Plus \$20**: M2.7 5-hour usage **+8%** (no reduction)
* **Max \$50**: M2.7 5-hour usage stays the same as your existing tier
* New **M3 access** is included, sharing the same quota pool with M2.7
* New **multimodal entitlements** — image and speech can all be called from the same quota pool
**The switch happens automatically. No action required.**
## 2. Starter \$10 / Plus-hs \$40 (legacy tiers)
These two tiers are preserved with **the same pricing and contracted relationship**, but are **only available to existing subscribers** — they are no longer offered to new users after the new plan launches.
* M2.7 usage stays the same as your existing tier
* New M3 access and multimodal quota are included, sharing the same quota pool with M2.7
These two legacy tiers are reserved exclusively for existing subscribers. We recommend keeping your subscription active to retain these entitlements; if you change tiers or cancel your subscription, the related legacy entitlements are considered waived and will not be reissued if you subscribe again later.
The switch happens automatically. No action required.
## 3. Retired tiers (Max-hs \$80 / Ultra-hs \$150)
These two tiers are being retired. We are providing a migration path with **a lower monthly fee but no reduction in entitlements**:
* **Max-hs \$80 → new Max \$50**: monthly fee reduced by \$30, with an additional **\~\$60 of credits granted each month** to cover the difference, plus multimodal entitlements
* **Ultra-hs \$150 → new Ultra \$120**: monthly fee reduced by \$30, with an additional **\~\$60 of credits granted each month** to cover the difference, including 5 video generations per day
You will be moved to the new tier automatically on your next renewal date. You can also choose another tier or unsubscribe at your discretion.
## 4. Annual subscribers
Entitlement protection for already-paid months: **M2.7 usage will not shrink, and all multimodal entitlements are preserved**. The annual discount rate continues to apply.
**Retired-tier annual plans (Max-hs annual / Ultra-hs annual)**: the price-difference compensation is not paid out as a one-time grant. Instead, **equivalent credits are granted each month based on your subscription cycle** (each grant has its own 1-year validity and does not roll over), ensuring your entitlements are not reduced over the full year.
Examples:
* **Ultra-hs \$150/month annual plan (8 months remaining)**: each month, on your subscription anniversary, you switch to the new Ultra \$120 entitlements and receive an additional **\~\$60 of credits** (\$30 difference × 2) for 8 consecutive months until the annual plan ends. After the annual plan expires, it auto-renews at the new Ultra \$120 annual price, and the annual discount continues to apply.
* **Max-hs \$80/month annual plan (6 months remaining)**: each month, on your subscription anniversary, you switch to the new Max \$50 entitlements and receive an additional **\~\$60 of credits** (\$30 difference × 2) for 6 consecutive months.
## 5. New Ultra \$120 heavy-use tier
A new tier that fills the gap between \$80 and \$150, designed for heavy agentic users. It provides roughly 12.5B tokens of monthly capacity and includes 5 video generations per day.
## 6. Legacy subscriber entitlements
Previously promised entitlements for eligible legacy subscribers remain in effect. Specific entitlement details, scope, and real-time usage status are account-specific; please refer to your usage dashboard or entitlement details page in the console.
These entitlements are applied automatically based on system records. No application is required.
## 7. About credits
* **1,000 credits = \$1** (1:1 parity with API pay-as-you-go pricing, no markup)
* **Usable across most models on the MiniMax API Platform** (MiniMax H3 model capabilities are not supported), deducted in real time at each model's pay-as-you-go list price
* **Shared across modalities**: text, image, speech, and video (where the tier supports it) all draw from the same credit pool
***
For any future Token Plan or tier adjustments, we will communicate clearly with all subscribers in advance. Thank you for your continued trust and support.
— The MiniMax Token Plan team
# Mini-Agent
Source: https://platform.minimax.io/docs/token-plan/mini-agent
Mini-Agent is a minimalist yet professional project that demonstrates best practices for building Agents using MiniMax M3. The project is fully compatible with the Anthropic API and supports interleaved thinking, unlocking the model's powerful reasoning capabilities for long and complex tasks.
View GitHub Repository
## Core Features
* **Complete Agent Execution Loop**: A robust execution framework with built-in tools for file system and shell operations
* **Persistent Memory**: Through the built-in Session Note Tool, the Agent can retain key information across multiple sessions
* **Intelligent Context Management**: Automatically summarizes conversation history, handling configurable token limits for unlimited task lengths
* **Integrated Claude Skills**: 15 built-in professional skills covering document processing, design, testing, and development
* **Integrated MCP Tools**: Native support for MCP protocol, easily connecting to knowledge graphs, web search, and other tools
* **Comprehensive Logging**: Detailed logs for every request, response, and tool execution for easy debugging
* **Clean Design**: Beautiful command-line interface and easy-to-understand codebase, making it an ideal starting point for building advanced Agents
***
## Usage Examples
### Task Execution
Ask the Agent to create a clean and beautiful webpage and display it in the browser, demonstrating the basic tool usage loop.

### Using Claude Skill (e.g., PDF Generation)
The Agent uses Claude Skill to create professional documents (such as PDF or DOCX) based on user requests, demonstrating its powerful advanced capabilities.

### Web Search and Summary (MCP Tool)
The Agent uses web search tools to find the latest information online and summarize it for the user.

***
## Quick Start
### 1. Install uv
```bash macOS/Linux/WSL theme={null}
curl -LsSf https://astral.sh/uv/install.sh | sh
# After installation, restart terminal or run:
source ~/.bashrc # or ~/.zshrc
```
```powershell Windows theme={null}
powershell -ExecutionPolicy ByPass -c "irm https://astral.sh/uv/install.ps1 | iex"
# Restart PowerShell after installation
```
### 2. Install Mini Agent
```bash theme={null}
uv tool install git+https://github.com/MiniMax-AI/Mini-Agent.git
```
### 3. Run Configuration Script
```bash macOS/Linux theme={null}
curl -fsSL https://raw.githubusercontent.com/MiniMax-AI/Mini-Agent/main/scripts/setup-config.sh | bash
```
```powershell Windows theme={null}
$r=Invoke-WebRequest -Uri "https://raw.githubusercontent.com/MiniMax-AI/Mini-Agent/main/scripts/setup-config.ps1" -UseBasicParsing;[IO.File]::WriteAllText("$env:TEMP\setup-config.ps1",$r.Content,(New-Object Text.UTF8Encoding $true));powershell -ExecutionPolicy Bypass -File "$env:TEMP\setup-config.ps1"
```
### 4. Configure API Key
The configuration script will create a config file in `~/.mini-agent/config/`. Edit this file:
```bash theme={null}
nano ~/.mini-agent/config/config.yaml
```
Enter your API Key and corresponding API Base:
```yaml theme={null}
api_key: "YOUR_API_KEY_HERE" # Enter your API Key
api_base: "https://api.minimax.io"
model: "MiniMax-M3"
```
### 5. Start Using
```bash theme={null}
mini-agent # Use current directory as workspace
mini-agent --workspace /path/to/your/project # Specify workspace directory
mini-agent --version # View version info
# Management commands
uv tool upgrade mini-agent # Upgrade to latest version
uv tool uninstall mini-agent # Uninstall tool
uv tool list # View all installed tools
```
***
## Development Mode
This mode is suitable for developers who need to modify code, add features, or debug.
**Installation and Configuration Steps:**
```bash theme={null}
# 1. Clone repository
git clone https://github.com/MiniMax-AI/Mini-Agent.git
cd Mini-Agent
# 2. Sync dependencies
uv sync
# 3. Initialize Claude Skills (optional)
git submodule update --init --recursive
# 4. Copy configuration template
cp mini_agent/config/config-example.yaml mini_agent/config/config.yaml
# 5. Edit configuration file
vim mini_agent/config/config.yaml
```
Enter your API Key and corresponding API Base:
```yaml theme={null}
api_key: "YOUR_API_KEY_HERE" # Enter your API Key
api_base: "https://api.minimax.io"
model: "MiniMax-M3"
max_steps: 100
workspace_dir: "./workspace"
```
**Running Methods:**
```bash theme={null}
# Method 1: Run as module directly (for debugging)
uv run python -m mini_agent.cli
# Method 2: Install in editable mode (recommended)
uv tool install -e .
mini-agent
mini-agent --workspace /path/to/your/project
```
For more development guidance, please refer to [Development Guide](https://github.com/MiniMax-AI/Mini-Agent/blob/main/docs/DEVELOPMENT_GUIDE_CN.md)
***
## ACP & Zed Editor Integration
Mini Agent supports Agent Communication Protocol (ACP) for integration with code editors like Zed.
**Setting up in Zed Editor:**
1. Install Mini Agent in development mode or tool mode
2. Add the following to your Zed `settings.json`:
```json theme={null}
{
"agent_servers": {
"mini-agent": {
"command": "/path/to/mini-agent-acp"
}
}
}
```
**Command Path:**
* If installed via `uv tool install`: use the output of `which mini-agent-acp`
* Development mode: `./mini_agent/acp/server.py`
**Usage:**
* Use `Ctrl+Shift+P` → "Agent: Toggle Panel" to open Zed's Agent panel
* Select "mini-agent" from the Agent dropdown
* Start chatting with Mini Agent directly in the editor
# MiniMax CLI
Source: https://platform.minimax.io/docs/token-plan/minimax-cli
[mmx-cli](https://github.com/MiniMax-AI/cli): one prompt to bring MiniMax into your AI agent
For Token Plan users, no coding is required to call MiniMax text, image, video, speech, vision, and web-search capabilities from agents such as OpenClaw and Claude Code. Availability depends on the current plan and CLI version.
If you still prefer direct API integration, see the [API Documentation](/docs/api-reference/api-overview).
### Install and configure the CLI
Copy the prompt below to your AI agent (OpenClaw, Claude Code, Cursor, MaxClaw, AutoClaw, KimiClaw, TRAE, OpenCode, etc.). It will guide you through installing the CLI, signing in, and adding the SKILL:
```text theme={null}
Please integrate MiniMax CLI (https://github.com/MiniMax-AI/cli) for me in three steps:
1. Install globally: run `npm install -g mmx-cli`, then verify with `mmx --version`
2. Sign in: run `mmx auth login --api-key sk-xxxxx` (replace sk-xxxxx with my actual key); the latest CLI auto-detects the service region from the API Key — if API calls return 401 later, fall back to `mmx config set --key region --value global|cn` to set it manually
3. Install the official SKILL (recommended, helps you call mmx more accurately afterwards): run `npx skills add MiniMax-AI/cli -y -g`
After that, run `mmx quota` to confirm my Token Plan balance.
```
Run the following command to install globally:
```bash theme={null}
npm install -g mmx-cli
```
Authenticate with your API Key (replace `sk-xxxxx` with your key):
```bash theme={null}
mmx auth login --api-key sk-xxxxx
```
The latest mmx-cli auto-detects the service region based on the API Key, so manual region configuration is usually unnecessary.
The service region depends on whether you purchased the API service from the mainland China platform (`cn`, [MiniMax China subscription](https://platform.minimaxi.com/subscribe/token-plan)) or the overseas platform (`global`, [MiniMax international subscription](https://platform.minimax.io/subscribe/token-plan)).
If your API calls return 401 after login, region detection likely failed. Set it manually:
```bash theme={null}
mmx config set --key region --value global # Overseas Service
mmx config set --key region --value cn # Mainland China Service
```
Run `mmx auth status` to confirm the active region matches the platform you purchased from.
If you want Claude Code, OpenClaw, Cursor, or other AI Agents to call mmx, install the official SKILL.md so the Agent can make better decisions and skip flipping through `--help`:
```bash theme={null}
npx skills add MiniMax-AI/cli -y -g
```
The SKILL is auto-symlinked into `~/.claude/skills/`, `~/.openclaw/skills/`, and similar Agent directories, and is recognized after the next Agent restart. **Skip this step if you only use mmx directly in the terminal.**
### Use the CLI
**Language**
`Use minimax to write a 4-line poem about AI`
***
**Video**
`Generate a video: at sunset, a cat sits by the window looking into the distance`
***
**Speech**
`Read in a gentle female voice: Welcome to MiniMax Token Plan. After subscribing, your AI agent can generate video, speech, and images with multimodal capability.`
***
**Image**
`Generate a cyberpunk city night scene in 16:9`
When no output option is specified, images are saved to the current working directory. Use `--out` for a single output path or `--out-dir` for batch output.
**Language**
`mmx text chat --message "Write a 4-line poem about AI"`
***
**Video**
`mmx video generate --prompt "At sunset, a cat sits by the window looking into the distance"`
***
**Speech**
`mmx speech synthesize --text "Welcome to MiniMax Token Plan. After subscribing, your AI agent can generate video, speech, and images with multimodal capability." --out voiceover.mp3`
***
**Image**
`mmx image "Cyberpunk city night scene, 16:9"`
### CLI Dashboard
Run mmx in your terminal to open the CLI panel and quickly discover the main commands, flags, and usage info.
![MMX-CLI panel overview]()
- resources: available resource types
- flags: supported options for commands
- usage: remaining quota and usage overview
- help: entry points for documentation
***
## Capability overview
MMX-CLI provides a single command-line entry point across text, image, video, speech, vision understanding, and web search:
| Capability | Basic command | Description |
| ------------ | ----------------------- | -------------------------------------------------------------- |
| **Language** | `mmx text chat` | multi-turn chat, streaming output, system prompts, JSON output |
| **Image** | `mmx image generate` | text-to-image, aspect ratio controls, batch generation |
| **Video** | `mmx video generate` | async generation, task status, downloading |
| **Speech** | `mmx speech synthesize` | text-to-speech (TTS), multiple voices, streaming |
| **Vision** | `mmx vision describe` | image understanding from local files, URLs, or file IDs |
| **Search** | `mmx search query` | built-in web search |
| Command | Purpose | Typical example |
| ------------------------------------ | ---------------------------------------------------------- | -------------------------------------------- |
| `mmx auth status / refresh / logout` | Show login identity / refresh credentials / log out | `mmx auth status` |
| `mmx config show / set` | View or change configuration (region, default model, etc.) | `mmx config set --key region --value global` |
| `mmx agent setup` | Configure MiniMax in AI coding tools | `mmx agent setup` |
| `mmx quota` | View Token Plan usage and remaining quota | `mmx quota` |
| `mmx update` | Show the current version and upgrade hint | `mmx update` |
***
### Usage coverage
For Token Plan quota and usage bar behavior, see: [Token Plan Pricing](/docs/guides/pricing-token-plan)
***
## FAQ
### Where do I get an API Key?
* **Overseas (default)**: [Subscribe to Token Plan on platform.minimax.io](https://platform.minimax.io/subscribe/token-plan) → API Key for the overseas service
* **Mainland China**: [Subscribe to Token Plan on platform.minimaxi.com](https://platform.minimaxi.com/subscribe/token-plan) → API Key for the mainland China service
### Still getting 401 after login?
`mmx auth login` usually auto-detects the service region from the API Key. If you still get 401, region detection likely failed — set it manually:
```bash theme={null}
mmx config set --key region --value global # Overseas plan
mmx config set --key region --value cn # Mainland China plan
```
Then run `mmx auth status` to confirm the active region matches the platform you purchased from.
***
# OpenClaw
Source: https://platform.minimax.io/docs/token-plan/openclaw
Use the latest MiniMax M-series models for anything you can think of in OpenClaw.
[**OpenClaw**](https://github.com/openclaw/openclaw) is a personal AI assistant running locally, integrating with messaging platforms for control.
## Prerequisites
* A MiniMax [Subscription Key](https://platform.minimax.io/user-center/payment/token-plan) with Token Plan or Credits access
* A computer with terminal access (macOS, Linux, or Windows with WSL)
***
## Install and Configure OpenClaw
Run the installation command in your terminal:
```bash theme={null}
curl -fsSL https://openclaw.ai/install.sh | bash
```
You'll see this entry page:
![Entry page]() Select **"Yes"** .
Select **"QuickStart"** to use the guided setup.
Select **"MiniMax"** as the model provider.
Select **"MiniMax Global — OAuth (minimax.io)"** as the authentication method.
You'll be sent to a browser window to sign in to or sign up for your MiniMax API Platform account.
Select **"Authorize"**, after which you can return to the terminal.
Select **"Yes"** .
Select **"QuickStart"** to use the guided setup.
Select **"MiniMax"** as the model provider.
Select **"MiniMax Global — OAuth (minimax.io)"** as the authentication method.
You'll be sent to a browser window to sign in to or sign up for your MiniMax API Platform account.
Select **"Authorize"**, after which you can return to the terminal.
![Authorize]() A model picker will appear with the available models already selected. Press **Enter** to continue.
Back in the terminal, select a messaging channel to connect. OpenClaw supports a range of platforms including Telegram, WhatsApp, Discord, iMessage, and more.
A model picker will appear with the available models already selected. Press **Enter** to continue.
Back in the terminal, select a messaging channel to connect. OpenClaw supports a range of platforms including Telegram, WhatsApp, Discord, iMessage, and more.
![Select channel]() Follow the prompts for your chosen channel, then select **"Yes"** when asked to confirm.
Follow the prompts for your chosen channel, then select **"Yes"** when asked to confirm.
![Confirm]() Select any additional skills you wish to install (press space to select, up and down arrows to navigate).
Select any additional skills you wish to install (press space to select, up and down arrows to navigate).
![Select skills]() Configure additional API Keys for tools that OpenClaw can use (optional). Select **"Skip for now"** if you don't need additional tools.
Configure additional API Keys for tools that OpenClaw can use (optional). Select **"Skip for now"** if you don't need additional tools.
![Configure API Keys]() Select **"Open the Web UI"** to access the OpenClaw dashboard.
Select **"Open the Web UI"** to access the OpenClaw dashboard.
![Open Web UI]() ***
## Toggle thinking
Toggle thinking at runtime with `/think`: `off` turns it off, `adaptive` (the default) lets M3 decide when to think.
***
## Advanced Capabilities
### Image Understanding
This page is written against OpenClaw `v2026.7.1-2`: its bundled MiniMax provider includes image understanding, image, video, speech, and music capabilities. Model catalogs and tools can vary by version; verify with `openclaw --version` and `openclaw models list`.
OpenClaw `v2026.7.1-2` provides image understanding through the built-in MiniMax provider and `MiniMax-VL-01`; no additional MCP installation is required. Check the release notes before using another version.
Use one of the methods below only with an older OpenClaw version or when you specifically need a standalone MCP client.
[MiniMax CLI](https://github.com/MiniMax-AI/cli) (the `mmx` command) is the official command-line tool and an alternative integration path for older OpenClaw versions.
Make sure Node.js 18+ is available:
```bash theme={null}
# Check Node.js version (should be >= 18)
node -v
# If not installed, install LTS via nvm
curl -o- https://raw.githubusercontent.com/nvm-sh/nvm/v0.39.7/install.sh | bash
nvm install --lts
```
Run the following command in your terminal for a global install:
```bash theme={null}
npm install -g mmx-cli
```
⭐️ OpenClaw can install the CLI and SKILL; enter the API key locally at authentication rather than pasting it into the Agent chat:
```plaintext theme={null}
Please set up MiniMax CLI (https://github.com/MiniMax-AI/cli). Pause at authentication so I can enter the API key locally; do not request, print, or record my secret.
1. Install CLI globally: run `npm install -g mmx-cli`, then verify with `mmx --version`
2. Authentication: tell me to run `mmx auth login` in my local terminal; do not ask me to paste the API key into this chat
3. Install the official SKILL: run `npx skills add MiniMax-AI/cli -y -g`
After that, please run `mmx quota` to check my Token Plan balance and confirm everything is wired up.
```
Authenticate with your API Key. Enter it in the local terminal rather than pasting it into the Agent chat:
```bash theme={null}
mmx auth login
```
The latest mmx-cli auto-detects your service region from the Key — no manual region setup is usually needed.
The region follows the platform where your API service was purchased: `cn` for the [MiniMax China Token Plan](https://platform.minimaxi.com/subscribe/token-plan), or `global` for the [MiniMax International Token Plan](https://platform.minimax.io/subscribe/token-plan).
If you hit a 401 after logging in, the region likely didn't auto-match. Set it manually:
```bash theme={null}
mmx config set --key region --value cn # China API service
mmx config set --key region --value global # International API service
```
Run `mmx auth status` to confirm the region matches the platform where your subscription was purchased.
Once logged in, run `mmx quota` to view your Token Plan balance and confirm the setup is working.
If you'll be invoking `mmx` from inside OpenClaw, we recommend adding the official SKILL.md so the agent makes better tool calls without having to read `--help` on the fly:
```bash theme={null}
npx skills add MiniMax-AI/cli -y -g
```
The SKILL is auto-symlinked into `~/.openclaw/skills/`, and OpenClaw will pick it up on the next launch.
Tell OpenClaw to prefer `mmx vision` for any future image understanding:
```plaintext theme={null}
Going forward, prefer the mmx vision tool for image understanding,
invoke it via `mmx vision describe --image ` and parse the result.
```
Send an image in OpenClaw and check that it auto-invokes `mmx vision describe --image ` and returns a correct description.
Wire up the [Token Plan MCP](/docs/guides/token-plan-mcp-guide) to use the `understand_image` tool.
Make sure uv (the Python package manager) is available:
```bash theme={null}
# Check
which uv
# If not installed, via pip
pip install uv
# Or via curl
curl -LsSf https://astral.sh/uv/install.sh | sh
```
For manual setup, follow the [Token Plan MCP guide](/docs/guides/token-plan-mcp-guide). Core steps:
1. Install the `mcporter` skill (an MCP server manager)
2. Configure `minimax-coding-plan-mcp` per the official guide
3. Set the `MINIMAX_API_KEY` environment variable (Token Plan API Key starts with `sk-cp`):
```bash theme={null}
export MINIMAX_API_KEY="sk-..."
```
⭐️ OpenClaw can install the MCP; enter the subscription key locally at authentication rather than pasting it into the Agent chat:
```plaintext theme={null}
First install the mcporter skill, then follow https://platform.minimax.io/docs/token-plan/mcp-guide to configure the MCP. Pause at authentication so I can enter the subscription key locally; do not request, print, or record it.
```
Tell OpenClaw to prefer `understand_image` for image understanding:
```plaintext theme={null}
Going forward, use the understand_image tool from minimax-coding-plan-mcp for any image understanding.
```
Send an image in OpenClaw and check it auto-invokes the `understand_image` tool and returns a correct description.
***
### Web Search
OpenClaw `v2026.7.1-2` provides `web_search` through the API-key MiniMax provider. Use one of the methods below with another version or when you need a standalone MCP client (requires a Token Plan subscription key).
`mmx search` is the web-search command from MiniMax CLI. No separate MCP server process — OpenClaw invokes it directly via Bash.
Make sure Node.js 18+ is available:
```bash theme={null}
# Check Node.js version (should be >= 18)
node -v
# If not installed, install LTS via nvm
curl -o- https://raw.githubusercontent.com/nvm-sh/nvm/v0.39.7/install.sh | bash
nvm install --lts
```
Run the following command in your terminal for a global install:
```bash theme={null}
npm install -g mmx-cli
```
⭐️ OpenClaw can install the CLI and SKILL; enter the API key locally at the authentication step rather than pasting it into the Agent chat:
```plaintext theme={null}
Please set up MiniMax CLI (https://github.com/MiniMax-AI/cli). Pause at authentication so I can enter the API key locally; do not request, print, or record my secret.
1. Install CLI globally: run `npm install -g mmx-cli`, then verify with `mmx --version`
2. Authentication: tell me to run `mmx auth login` in my local terminal
3. Install the official SKILL: run `npx skills add MiniMax-AI/cli -y -g`
After that, please run `mmx quota` to check my Token Plan balance and confirm everything is wired up.
```
Authenticate with your API Key. Enter it in the local terminal rather than pasting it into the Agent chat:
```bash theme={null}
mmx auth login
```
The latest mmx-cli auto-detects your service region from the Key — no manual region setup is usually needed.
The region follows the platform where your API service was purchased: `cn` for the [MiniMax China Token Plan](https://platform.minimaxi.com/subscribe/token-plan), or `global` for the [MiniMax International Token Plan](https://platform.minimax.io/subscribe/token-plan).
If you hit a 401 after logging in, the region likely didn't auto-match. Set it manually:
```bash theme={null}
mmx config set --key region --value cn # China API service
mmx config set --key region --value global # International API service
```
Run `mmx auth status` to confirm the region matches the platform where your subscription was purchased.
Once logged in, run `mmx quota` to view your Token Plan balance and confirm the setup is working.
If you'll be invoking `mmx` from inside OpenClaw, we recommend adding the official SKILL.md so the agent makes better tool calls without having to read `--help` on the fly:
```bash theme={null}
npx skills add MiniMax-AI/cli -y -g
```
The SKILL is auto-symlinked into `~/.openclaw/skills/`, and OpenClaw will pick it up on the next launch.
`mmx search` offers two invocation forms:
```bash theme={null}
# Simple call (human-friendly, readable text output)
mmx search "latest MiniMax AI updates"
# Structured call (Agent-friendly)
mmx search query --q "MiniMax M2.7 release" --output json
```
Example prompt for OpenClaw:
```plaintext theme={null}
Use the mmx search tool to search "OpenClaw multi-Agent orchestration",
invoke it via `mmx search query --q "..." --output json` to get structured results,
then summarize the top 3 hits' titles, links, and key snippets.
```
OpenClaw will run `mmx search query --q "..." --output json` via the Bash tool and hand the stdout JSON to the model directly — no MCP server process needed.
```plaintext theme={null}
Going forward, prefer the mmx search tool for web search,
invoke it via `mmx search query --q "..." --output json` and parse the JSON.
```
Wire up the [Token Plan MCP](/docs/token-plan/mcp-guide) to use the `web_search` tool.
Make sure uv (the Python package manager) is available:
```bash theme={null}
# Check
which uv
# If not installed, via pip
pip install uv
# Or via curl
curl -LsSf https://astral.sh/uv/install.sh | sh
```
For manual setup, follow the [Token Plan MCP guide](/docs/token-plan/mcp-guide). Core steps:
1. Install the `mcporter` skill (an MCP server manager)
2. Configure `minimax-coding-plan-mcp` per the official guide
3. Set the `MINIMAX_API_KEY` environment variable (Token Plan API Key starts with `sk-cp`):
```bash theme={null}
export MINIMAX_API_KEY="sk-..."
```
⭐️ OpenClaw can install the MCP; enter the subscription key locally at authentication rather than pasting it into the Agent chat:
```plaintext theme={null}
First install the mcporter skill, then follow https://platform.minimax.io/docs/token-plan/mcp-guide to configure the MCP. Pause at authentication so I can enter the subscription key locally; do not request, print, or record it.
```
Tell OpenClaw to prefer `web_search`:
```plaintext theme={null}
Going forward, use the web_search tool from minimax-coding-plan-mcp for any web search.
```
Ask OpenClaw something requiring up-to-date info, and check it auto-invokes the `web_search` tool and returns search results.
For a full step-by-step walkthrough of connecting OpenClaw to Telegram (including bot creation and pairing), see the [OpenClaw Cookbook guide](/docs/solutions/openclaw).
# Other Tools
Source: https://platform.minimax.io/docs/token-plan/other-tools
Configure the latest MiniMax M-series models in any AI coding tool that supports custom OpenAI-compatible or Anthropic-compatible endpoints.
The pages above walk through the most popular AI coding tools step-by-step. For other tools that accept a custom Base URL + API Key, use the values below.
## Configuration Reference
MiniMax exposes two protocols. Pick whichever your tool supports — most modern tools support at least one.
### OpenAI-Compatible Protocol
| Field | Value |
| ------------ | ---------------------------------------------------------------------------------- |
| **Provider** | `OpenAI Compatible` (sometimes called `Custom` or `OpenAI-format`) |
| **Base URL** | `https://api.minimax.io/v1` |
| **API Key** | [Get Subscription Key](https://platform.minimax.io/user-center/payment/token-plan) |
| **Model ID** | `MiniMax-M3` |
### Anthropic-Compatible Protocol
| Field | Value |
| ------------ | ---------------------------------------------------------------------------------- |
| **Provider** | `Anthropic Compatible` (sometimes called `Claude` or `Custom Anthropic`) |
| **Base URL** | `https://api.minimax.io/anthropic` |
| **API Key** | [Get Subscription Key](https://platform.minimax.io/user-center/payment/token-plan) |
| **Model ID** | `MiniMax-M3` |
## Which Protocol Should I Pick?
| Tool style | Recommended protocol | Typical env vars |
| ----------------------------------------------------- | ---------------------------------------------------------------------------- | --------------------------------------------- |
| Claude Code-style (TUI / CLI written for Anthropic) | Anthropic-Compatible | `ANTHROPIC_BASE_URL` + `ANTHROPIC_AUTH_TOKEN` |
| Cursor / Continue / Aider / OpenAI-format IDE plugins | OpenAI-Compatible | `OPENAI_BASE_URL` + `OPENAI_API_KEY` |
| Tools that ask for both | Either works — Anthropic-Compatible is recommended for prompt-cache benefits | |
## Cherry Studio
***
## Toggle thinking
Toggle thinking at runtime with `/think`: `off` turns it off, `adaptive` (the default) lets M3 decide when to think.
***
## Advanced Capabilities
### Image Understanding
This page is written against OpenClaw `v2026.7.1-2`: its bundled MiniMax provider includes image understanding, image, video, speech, and music capabilities. Model catalogs and tools can vary by version; verify with `openclaw --version` and `openclaw models list`.
OpenClaw `v2026.7.1-2` provides image understanding through the built-in MiniMax provider and `MiniMax-VL-01`; no additional MCP installation is required. Check the release notes before using another version.
Use one of the methods below only with an older OpenClaw version or when you specifically need a standalone MCP client.
[MiniMax CLI](https://github.com/MiniMax-AI/cli) (the `mmx` command) is the official command-line tool and an alternative integration path for older OpenClaw versions.
Make sure Node.js 18+ is available:
```bash theme={null}
# Check Node.js version (should be >= 18)
node -v
# If not installed, install LTS via nvm
curl -o- https://raw.githubusercontent.com/nvm-sh/nvm/v0.39.7/install.sh | bash
nvm install --lts
```
Run the following command in your terminal for a global install:
```bash theme={null}
npm install -g mmx-cli
```
⭐️ OpenClaw can install the CLI and SKILL; enter the API key locally at authentication rather than pasting it into the Agent chat:
```plaintext theme={null}
Please set up MiniMax CLI (https://github.com/MiniMax-AI/cli). Pause at authentication so I can enter the API key locally; do not request, print, or record my secret.
1. Install CLI globally: run `npm install -g mmx-cli`, then verify with `mmx --version`
2. Authentication: tell me to run `mmx auth login` in my local terminal; do not ask me to paste the API key into this chat
3. Install the official SKILL: run `npx skills add MiniMax-AI/cli -y -g`
After that, please run `mmx quota` to check my Token Plan balance and confirm everything is wired up.
```
Authenticate with your API Key. Enter it in the local terminal rather than pasting it into the Agent chat:
```bash theme={null}
mmx auth login
```
The latest mmx-cli auto-detects your service region from the Key — no manual region setup is usually needed.
The region follows the platform where your API service was purchased: `cn` for the [MiniMax China Token Plan](https://platform.minimaxi.com/subscribe/token-plan), or `global` for the [MiniMax International Token Plan](https://platform.minimax.io/subscribe/token-plan).
If you hit a 401 after logging in, the region likely didn't auto-match. Set it manually:
```bash theme={null}
mmx config set --key region --value cn # China API service
mmx config set --key region --value global # International API service
```
Run `mmx auth status` to confirm the region matches the platform where your subscription was purchased.
Once logged in, run `mmx quota` to view your Token Plan balance and confirm the setup is working.
If you'll be invoking `mmx` from inside OpenClaw, we recommend adding the official SKILL.md so the agent makes better tool calls without having to read `--help` on the fly:
```bash theme={null}
npx skills add MiniMax-AI/cli -y -g
```
The SKILL is auto-symlinked into `~/.openclaw/skills/`, and OpenClaw will pick it up on the next launch.
Tell OpenClaw to prefer `mmx vision` for any future image understanding:
```plaintext theme={null}
Going forward, prefer the mmx vision tool for image understanding,
invoke it via `mmx vision describe --image ` and parse the result.
```
Send an image in OpenClaw and check that it auto-invokes `mmx vision describe --image ` and returns a correct description.
Wire up the [Token Plan MCP](/docs/guides/token-plan-mcp-guide) to use the `understand_image` tool.
Make sure uv (the Python package manager) is available:
```bash theme={null}
# Check
which uv
# If not installed, via pip
pip install uv
# Or via curl
curl -LsSf https://astral.sh/uv/install.sh | sh
```
For manual setup, follow the [Token Plan MCP guide](/docs/guides/token-plan-mcp-guide). Core steps:
1. Install the `mcporter` skill (an MCP server manager)
2. Configure `minimax-coding-plan-mcp` per the official guide
3. Set the `MINIMAX_API_KEY` environment variable (Token Plan API Key starts with `sk-cp`):
```bash theme={null}
export MINIMAX_API_KEY="sk-..."
```
⭐️ OpenClaw can install the MCP; enter the subscription key locally at authentication rather than pasting it into the Agent chat:
```plaintext theme={null}
First install the mcporter skill, then follow https://platform.minimax.io/docs/token-plan/mcp-guide to configure the MCP. Pause at authentication so I can enter the subscription key locally; do not request, print, or record it.
```
Tell OpenClaw to prefer `understand_image` for image understanding:
```plaintext theme={null}
Going forward, use the understand_image tool from minimax-coding-plan-mcp for any image understanding.
```
Send an image in OpenClaw and check it auto-invokes the `understand_image` tool and returns a correct description.
***
### Web Search
OpenClaw `v2026.7.1-2` provides `web_search` through the API-key MiniMax provider. Use one of the methods below with another version or when you need a standalone MCP client (requires a Token Plan subscription key).
`mmx search` is the web-search command from MiniMax CLI. No separate MCP server process — OpenClaw invokes it directly via Bash.
Make sure Node.js 18+ is available:
```bash theme={null}
# Check Node.js version (should be >= 18)
node -v
# If not installed, install LTS via nvm
curl -o- https://raw.githubusercontent.com/nvm-sh/nvm/v0.39.7/install.sh | bash
nvm install --lts
```
Run the following command in your terminal for a global install:
```bash theme={null}
npm install -g mmx-cli
```
⭐️ OpenClaw can install the CLI and SKILL; enter the API key locally at the authentication step rather than pasting it into the Agent chat:
```plaintext theme={null}
Please set up MiniMax CLI (https://github.com/MiniMax-AI/cli). Pause at authentication so I can enter the API key locally; do not request, print, or record my secret.
1. Install CLI globally: run `npm install -g mmx-cli`, then verify with `mmx --version`
2. Authentication: tell me to run `mmx auth login` in my local terminal
3. Install the official SKILL: run `npx skills add MiniMax-AI/cli -y -g`
After that, please run `mmx quota` to check my Token Plan balance and confirm everything is wired up.
```
Authenticate with your API Key. Enter it in the local terminal rather than pasting it into the Agent chat:
```bash theme={null}
mmx auth login
```
The latest mmx-cli auto-detects your service region from the Key — no manual region setup is usually needed.
The region follows the platform where your API service was purchased: `cn` for the [MiniMax China Token Plan](https://platform.minimaxi.com/subscribe/token-plan), or `global` for the [MiniMax International Token Plan](https://platform.minimax.io/subscribe/token-plan).
If you hit a 401 after logging in, the region likely didn't auto-match. Set it manually:
```bash theme={null}
mmx config set --key region --value cn # China API service
mmx config set --key region --value global # International API service
```
Run `mmx auth status` to confirm the region matches the platform where your subscription was purchased.
Once logged in, run `mmx quota` to view your Token Plan balance and confirm the setup is working.
If you'll be invoking `mmx` from inside OpenClaw, we recommend adding the official SKILL.md so the agent makes better tool calls without having to read `--help` on the fly:
```bash theme={null}
npx skills add MiniMax-AI/cli -y -g
```
The SKILL is auto-symlinked into `~/.openclaw/skills/`, and OpenClaw will pick it up on the next launch.
`mmx search` offers two invocation forms:
```bash theme={null}
# Simple call (human-friendly, readable text output)
mmx search "latest MiniMax AI updates"
# Structured call (Agent-friendly)
mmx search query --q "MiniMax M2.7 release" --output json
```
Example prompt for OpenClaw:
```plaintext theme={null}
Use the mmx search tool to search "OpenClaw multi-Agent orchestration",
invoke it via `mmx search query --q "..." --output json` to get structured results,
then summarize the top 3 hits' titles, links, and key snippets.
```
OpenClaw will run `mmx search query --q "..." --output json` via the Bash tool and hand the stdout JSON to the model directly — no MCP server process needed.
```plaintext theme={null}
Going forward, prefer the mmx search tool for web search,
invoke it via `mmx search query --q "..." --output json` and parse the JSON.
```
Wire up the [Token Plan MCP](/docs/token-plan/mcp-guide) to use the `web_search` tool.
Make sure uv (the Python package manager) is available:
```bash theme={null}
# Check
which uv
# If not installed, via pip
pip install uv
# Or via curl
curl -LsSf https://astral.sh/uv/install.sh | sh
```
For manual setup, follow the [Token Plan MCP guide](/docs/token-plan/mcp-guide). Core steps:
1. Install the `mcporter` skill (an MCP server manager)
2. Configure `minimax-coding-plan-mcp` per the official guide
3. Set the `MINIMAX_API_KEY` environment variable (Token Plan API Key starts with `sk-cp`):
```bash theme={null}
export MINIMAX_API_KEY="sk-..."
```
⭐️ OpenClaw can install the MCP; enter the subscription key locally at authentication rather than pasting it into the Agent chat:
```plaintext theme={null}
First install the mcporter skill, then follow https://platform.minimax.io/docs/token-plan/mcp-guide to configure the MCP. Pause at authentication so I can enter the subscription key locally; do not request, print, or record it.
```
Tell OpenClaw to prefer `web_search`:
```plaintext theme={null}
Going forward, use the web_search tool from minimax-coding-plan-mcp for any web search.
```
Ask OpenClaw something requiring up-to-date info, and check it auto-invokes the `web_search` tool and returns search results.
For a full step-by-step walkthrough of connecting OpenClaw to Telegram (including bot creation and pairing), see the [OpenClaw Cookbook guide](/docs/solutions/openclaw).
# Other Tools
Source: https://platform.minimax.io/docs/token-plan/other-tools
Configure the latest MiniMax M-series models in any AI coding tool that supports custom OpenAI-compatible or Anthropic-compatible endpoints.
The pages above walk through the most popular AI coding tools step-by-step. For other tools that accept a custom Base URL + API Key, use the values below.
## Configuration Reference
MiniMax exposes two protocols. Pick whichever your tool supports — most modern tools support at least one.
### OpenAI-Compatible Protocol
| Field | Value |
| ------------ | ---------------------------------------------------------------------------------- |
| **Provider** | `OpenAI Compatible` (sometimes called `Custom` or `OpenAI-format`) |
| **Base URL** | `https://api.minimax.io/v1` |
| **API Key** | [Get Subscription Key](https://platform.minimax.io/user-center/payment/token-plan) |
| **Model ID** | `MiniMax-M3` |
### Anthropic-Compatible Protocol
| Field | Value |
| ------------ | ---------------------------------------------------------------------------------- |
| **Provider** | `Anthropic Compatible` (sometimes called `Claude` or `Custom Anthropic`) |
| **Base URL** | `https://api.minimax.io/anthropic` |
| **API Key** | [Get Subscription Key](https://platform.minimax.io/user-center/payment/token-plan) |
| **Model ID** | `MiniMax-M3` |
## Which Protocol Should I Pick?
| Tool style | Recommended protocol | Typical env vars |
| ----------------------------------------------------- | ---------------------------------------------------------------------------- | --------------------------------------------- |
| Claude Code-style (TUI / CLI written for Anthropic) | Anthropic-Compatible | `ANTHROPIC_BASE_URL` + `ANTHROPIC_AUTH_TOKEN` |
| Cursor / Continue / Aider / OpenAI-format IDE plugins | OpenAI-Compatible | `OPENAI_BASE_URL` + `OPENAI_API_KEY` |
| Tools that ask for both | Either works — Anthropic-Compatible is recommended for prompt-cache benefits | |
## Cherry Studio
[**Cherry Studio**](https://github.com/CherryHQ/cherry-studio) is an open-source desktop client supporting 50+ LLM providers, with built-in MCP servers and 300+ assistants.
Install Cherry Studio per the [official docs](https://docs.cherryai.com.cn/docs/en-us/cherry-studio/installation).
Open Cherry Studio → click **Choose other Providers** → search `MiniMax`, then pick **MiniMax**.
Enter your [Subscription Key](https://platform.minimax.io/user-center/payment/token-plan) (the API Host is prefilled), then click **Check** to verify.
Select `MiniMax-M3` from the model list.
## Chatbox
[**Chatbox**](https://github.com/chatboxai/chatbox) is a free, open-source, cross-platform AI client supporting advanced LLMs, custom API keys (BYOK), and AI agents across desktop, mobile, and web.
Install Chatbox per the [official docs](https://chatboxai.app/en/guide).
Open Chatbox → click **Settings** → click **Model Provider** → click **Add** → search `MiniMax`, then pick **MiniMax CN** or **MiniMax Global**.
Enter your [Subscription Key](https://platform.minimax.io/user-center/payment/token-plan) (the API Host is prefilled), then click **Check** next to **API Key** to verify the connection.
Select `MiniMax-M3` from the model list.
## Xcode
[**Xcode**](https://developer.apple.com/xcode/) is Apple's official IDE for macOS, iOS, iPadOS, watchOS, and visionOS, now with built-in Coding Intelligence.
Install Xcode 26 or later from the [Mac App Store](https://apps.apple.com/us/app/xcode/id497799835).
Open Xcode → top menu **Xcode → Settings → Intelligence → Add a Model Provider**, choose the **Internet Hosted** tab, and fill in:
* **URL**: `https://api.minimax.io` (bare host, no path)
* **API Key Header**: `Authorization` (override the default `x-api-key`)
* **API Key**: `Bearer ` (the word `Bearer`, **a single space**, then your `sk-cp-…` key — [get one here](https://platform.minimax.io/user-center/payment/token-plan))
* **Description**: `MiniMax` (any value)
![Xcode Add a Model Provider dialog]() Click **Add**. Back in the Intelligence pane, open the new MiniMax provider and enable `MiniMax-M3`.
Open any project, press **⌘+0** to bring up the Coding Assistant, click the edit icon at the top-left to pick `MiniMax-M3`.
## Kilo Code
Click **Add**. Back in the Intelligence pane, open the new MiniMax provider and enable `MiniMax-M3`.
Open any project, press **⌘+0** to bring up the Coding Assistant, click the edit icon at the top-left to pick `MiniMax-M3`.
## Kilo Code
[**Kilo Code**](https://github.com/Kilo-Org/kilocode) is an open-source AI coding agent for VS Code, supporting multiple LLM providers and MCP servers.
First clear the `ANTHROPIC_AUTH_TOKEN` and `ANTHROPIC_BASE_URL` env vars — otherwise they will override the configuration.
Search `Kilo Code` in the VS Code Extensions panel and install.
Open Kilo Code → **Settings**:
* **API Provider** = `MiniMax`
* **MiniMax Entrypoint** = `api.minimax.io`
* **MiniMax API Key** = your [Subscription Key](https://platform.minimax.io/user-center/payment/token-plan)
* **Model** = `MiniMax-M3`
Click **Save** then **Done**.
## Zed
[**Zed**](https://github.com/zed-industries/zed) is an open-source, high-performance multiplayer code editor written in Rust by the Atom creators.
Install Zed per the [official docs](https://zedhub.org/getting-started).
Settings → **LLM Provider** → **+Add Provider** → choose **OpenAI**, fill:
* **API URL** = `https://api.minimax.io/v1`
* **API Key** = from [Token Plan](https://platform.minimax.io/user-center/payment/token-plan)
* **Model Name** = `MiniMax-M3`
Click **Save Provider**. Then back in the LLM Provider list, click the new MiniMax entry, **re-enter the API Key and press Enter** to confirm.
Return to the agent panel, click **Select a Model** at the bottom-right and pick `MiniMax-M3`.
## OpenCode
[**OpenCode**](https://github.com/sst/opencode) is an open-source terminal AI coding agent by SST, with multi-provider support and LSP integration.
Run:
```bash theme={null}
npx -y mmx-cli@latest agent setup
```
Select **OpenCode**. If it is missing, keep OpenCode selected in the second multi-select. The wizard installs the official npm package, verifies its version, and makes MiniMax M3 the default model.
Run `opencode` when setup finishes. See [One-click setup wizard](/docs/token-plan/agent-setup) for command options and backup behavior.
OpenCode has **built-in MiniMax-M3 support** — no config file needed.
```bash theme={null}
curl -fsSL https://opencode.ai/install | bash
# or: npm i -g opencode-ai
```
Run `opencode auth login`, then when prompted, search and pick **MiniMax Token Plan (minimax.io)**, and enter your [Token Plan](https://platform.minimax.io/user-center/payment/token-plan) API Key.
Run `opencode` to start.
## Grok CLI
[**Grok CLI**](https://github.com/superagent-ai/grok-cli) is an open-source terminal coding agent that connects to xAI's Grok and OpenAI-compatible providers.
Not recommended for Agent workflows — use **Claude Code** or **Cursor** for best results.
First clear the `OPENAI_API_KEY` and `OPENAI_BASE_URL` env vars.
Run:
```bash theme={null}
npx -y mmx-cli@latest agent setup
```
Select **Grok CLI**. If it is missing, keep Grok CLI selected in the second multi-select. The wizard runs the official Grok Build installer, checks `grok --version`, preserves unrelated settings, and adds MiniMax M3 to `~/.grok/config.toml`.
Run `grok` when setup finishes. See [One-click setup wizard](/docs/token-plan/agent-setup) for details.
```bash theme={null}
npm install -g @vibe-kit/grok-cli
```
```bash theme={null}
export GROK_BASE_URL=https://api.minimax.io/v1
export GROK_API_KEY=sk-cp-... # from Token Plan
grok --model MiniMax-M3
```
## Droid
[**Droid**](https://factory.ai) is Factory's official terminal coding agent that integrates with IDEs and developer collaboration tools.
You must first clear the `ANTHROPIC_AUTH_TOKEN` env var (otherwise it overrides the API Key in `config.json`). Note the config file path is `~/.factory/config.json` (**not** `settings.json`).
```bash theme={null}
curl -fsSL https://app.factory.ai/cli | sh # macOS / Linux
# Windows: irm https://app.factory.ai/cli/windows | iex
```
Edit `~/.factory/config.json`:
```json theme={null}
{
"custom_models": [{
"model_display_name": "MiniMax-M3",
"model": "MiniMax-M3",
"base_url": "https://api.minimax.io/anthropic",
"api_key": "",
"provider": "anthropic",
"max_tokens": 64000
}]
}
```
Launch `droid`, then `/model` and pick `MiniMax-M3`.
## Qwen Code
[**Qwen Code**](https://github.com/QwenLM/qwen-code) is Alibaba's open-source terminal coding agent optimized for the Qwen model family.
Linux / macOS:
```bash theme={null}
bash -c "$(curl -fsSL https://qwen-code-assets.oss-cn-hangzhou.aliyuncs.com/installation/install-qwen.sh)"
```
Windows (works in both Command Prompt and PowerShell):
```powershell theme={null}
powershell -Command "Invoke-WebRequest 'https://qwen-code-assets.oss-cn-hangzhou.aliyuncs.com/installation/install-qwen.bat' -OutFile (Join-Path $env:TEMP 'install-qwen.bat'); & (Join-Path $env:TEMP 'install-qwen.bat')"
```
Run `qwen` in your terminal. Pick **Third-party Providers** → **MiniMax API Key** → region **International**.
Enter your API Key from [Token Plan](https://platform.minimax.io/user-center/payment/token-plan) (prefix `sk-cp-…`) and press Enter.
The default model ID should be `MiniMax-M3` — press Enter to submit and start chatting.
## Open WebUI
[**Open WebUI**](https://github.com/open-webui/open-webui) is a self-hosted, open-source AI chat platform with offline support, RAG, and multi-model runners.
Install via Python pip (requires **Python 3.11** to avoid compatibility issues):
```bash theme={null}
pip install open-webui
open-webui serve
```
Open [http://localhost:8080](http://localhost:8080) in your browser and follow the prompt to create a local admin account.
Click the avatar (top-right) → **Admin Panel** → top **Settings** tab → left **Connections**. In the **OpenAI** row, click **➕ Add Connection**, fill:
* **URL**: `https://api.minimax.io/v1`
* **Auth** (Bearer mode): your API Key from [Token Plan](https://platform.minimax.io/user-center/payment/token-plan) (prefix `sk-cp-…`)
Click **Save** and back in the chat view, pick `MiniMax-M3` from the top model selector to start chatting.
## nanobot
[**nanobot**](https://github.com/HKUDS/nanobot) is an ultra-lightweight open-source personal AI agent CLI from HKUDS, with chat channels, memory, and MCP support.
```bash theme={null}
uv tool install nanobot-ai
# or: pipx install nanobot-ai
# or: pip install nanobot-ai # may need --user or --break-system-packages on macOS
```
```bash theme={null}
nanobot onboard
```
Replace `sk-cp-...` with your [Token Plan API Key](https://platform.minimax.io/user-center/payment/token-plan):
```bash theme={null}
python3 -c '
import json, os, sys
p = os.path.expanduser("~/.nanobot/config.json")
c = json.load(open(p))
c["providers"]["minimax"]["apiKey"] = sys.argv[1]
c["providers"]["minimax"]["apiBase"] = "https://api.minimax.io/v1"
c["agents"]["defaults"]["provider"] = "minimax"
c["agents"]["defaults"]["model"] = "MiniMax-M3"
json.dump(c, open(p, "w"), indent=2)
' sk-cp-...
```
```bash theme={null}
nanobot agent
```
## OpenHands
[**OpenHands**](https://github.com/All-Hands-AI/OpenHands) (formerly OpenDevin) is an open-source AI software-development agent by All-Hands-AI, with TUI, web GUI, and IDE integrations.
```bash theme={null}
pipx install openhands
```
Replace `sk-cp-...` with your [Token Plan API Key](https://platform.minimax.io/user-center/payment/token-plan):
```bash theme={null}
pipx run --spec openhands python -c '
import sys
from openhands_cli.stores.agent_store import AgentStore
AgentStore().create_and_save_from_settings(
llm_api_key=sys.argv[1],
settings={"llm_model": "openai/MiniMax-M3",
"llm_base_url": "https://api.minimax.io/v1"},
)
' sk-cp-...
```
```bash theme={null}
openhands
```
## LangChain
[**LangChain**](https://github.com/langchain-ai/langchain) is the open-source framework by LangChain Inc. for building LLM-powered applications, with model adapters, retrieval, agents, and tracing.
```bash theme={null}
pip install langchain-openai
```
Replace `sk-cp-...` with your [Token Plan API Key](https://platform.minimax.io/user-center/payment/token-plan):
```python theme={null}
from langchain_openai import ChatOpenAI
llm = ChatOpenAI(
model="MiniMax-M3",
api_key="sk-cp-...",
base_url="https://api.minimax.io/v1",
)
print(llm.invoke("Hello").content)
```
# Pi
Source: https://platform.minimax.io/docs/token-plan/pi
Use the latest MiniMax M-series models in Pi, an open-source terminal coding agent.
[**Pi**](https://github.com/earendil-works/pi) is an open-source TUI coding agent from earendil-works that talks to any provider through a unified LLM API.
## Configure MiniMax
Automatic Pi installation requires Node.js 22.19 or newer. Run:
```bash theme={null}
npx -y mmx-cli@latest agent setup
```
Select **Pi**. If it is missing, keep Pi selected in the second multi-select. The wizard installs the official npm package, verifies its version, and adds MiniMax M3 to Pi's models and defaults.
Then launch Pi directly:
```bash theme={null}
pi
```
See [One-click setup wizard](/docs/token-plan/agent-setup) for command options and backup behavior.
```bash theme={null}
npm install -g @earendil-works/pi-coding-agent
```
Export your [Subscription Key](https://platform.minimax.io/user-center/payment/token-plan) (prefix `sk-cp-…`) and launch Pi:
```bash theme={null}
export MINIMAX_API_KEY=sk-cp-...
pi --provider minimax --model MiniMax-M3
```
# M-series Usage Tips
Source: https://platform.minimax.io/docs/token-plan/prompting-best-practices
Prompt patterns for using MiniMax Token Plan models effectively in coding, tool-use, agentic, and long-context workflows.
These patterns help you write stronger prompts for MiniMax Token Plan models. Each subsection pairs a weak prompt with a stronger one and explains why the stronger version is easier for the model to follow.
Jump to the topic you need — **General principles** for everyday quality, **Tool use** for agentic workflows, **Long context** for large source packages.
## General principles
### Be clear and direct
The model responds best when the task, constraints, and desired output are explicit. Tell it what to build, what to prioritize, and what a good answer should look like.
**Golden rule:** Show your prompt to a colleague who has no context on the task. If they would be confused, the model will be too.
**Less effective:**
```text theme={null}
Create a visualization website
```
**More effective:**
```text theme={null}
Create an enterprise-grade data visualization website.
Requirements:
- Include charts, filters, drill-down views, and export actions.
- Prioritize fast scanning for business analysts.
- Use a polished dashboard layout instead of a marketing landing page.
- Return the implementation plan before writing code.
```
### Add context to improve performance
When you explain why a constraint matters, the model can choose better tradeoffs. Context is especially valuable for formatting, safety, accessibility, and workflow constraints.
**Less effective:**
```text theme={null}
Do not use document symbols
```
**More effective:**
```text theme={null}
Your response will be read aloud by a text-to-speech model. Use plain text only, avoid document symbols, and keep sentences short enough to sound natural when spoken.
```
Add intent whenever the model could satisfy the literal instruction in a way that misses the real use case.
### Use examples effectively
A few well-crafted examples (few-shot or multishot prompting) usually beat abstract style instructions. When adding examples, make them:
* **Relevant:** mirror your actual use case.
* **Diverse:** cover edge cases and at least one ambiguous input.
* **Concrete:** show the exact output style, not just the topic.
**Less effective:**
```text theme={null}
Write an engaging product description for a smart thermos.
```
**More effective:**
```text theme={null}
Write a product description for a smart thermos.
Good example:
This desk lamp uses full-spectrum LED technology that simulates natural morning light to gently wake you up. It features 6 brightness levels for reading, working, and resting.
Avoid this kind of vague description:
This desk lamp is great, the light is comfortable, and the design is nice.
Now write the smart thermos description in the same concrete, benefit-led style.
```
For classification, structured extraction, or edge-case handling, give 3 to 5 diverse examples instead of one.
**Less effective:**
```text theme={null}
Classify each ticket as bug, feature request, or question.
```
**More effective:**
```text theme={null}
Classify each ticket as bug, feature request, or question.
Examples:
- "App crashes when I open settings" → bug
- "Add dark mode to the export panel" → feature request
- "How do I export to PDF?" → question
- "Crashes after requesting a new export option" → bug (the crash is the report; the feature mention is context)
- "Is this expected behavior?" with no other detail → question (do not classify as bug without confirmation)
```
Include 3–5 diverse examples for hard pattern-matching tasks. Repeating similar examples wastes tokens without teaching the model anything new.
### Use prompt templates
For repeated tasks, turn the prompt into a reusable template with named variables. This makes it easier to test across many inputs, compare versions, and keep behavior stable.
**Less effective:**
```text theme={null}
Reply to this customer complaint politely.
```
**More effective:**
```text theme={null}
You are a support specialist for [product name].
Customer message:
[customer message]
Known facts you can use:
[known facts]
Write a reply that:
- Acknowledges the customer's issue in the first sentence.
- Explains the next step using only the known facts above.
- Does not promise compensation, refunds, or timelines unless they appear in the known facts.
- Ends with one clear action for the customer.
```
Variables make the task, inputs, and guardrails visible, which helps when you debug regressions in production prompts.
### Match the output language
When the input mixes languages or you need a specific output language, say so explicitly — for example, "Reply in Chinese even if the source is in English." Without this, the model tends to follow the dominant input language.
## Output and formatting
### Structure prompts with clear sections
When your prompt mixes instructions, source material, examples, constraints, and output requirements, label each section so the model can tell them apart. Bold headers or labels with a trailing colon work better than running text.
**Less effective:**
```text theme={null}
Review this launch plan and tell me what to improve. Keep it practical. The audience is the sales team. We care about enterprise customers and partner motions. Also make a table.
[long launch plan]
```
**More effective:**
```text theme={null}
Task: review the launch plan and identify the highest-impact improvements.
Context: the audience is the sales team. Prioritize enterprise customers and partner motions.
Source:
[long launch plan]
Output format:
Return a table with columns: Area, Issue, Recommendation, Priority.
Keep each recommendation actionable and under 40 words.
```
Use short, descriptive labels — Task, Context, Source, Constraints, Output format. A bold header or trailing colon is enough to mark each section. Keep the structure flat; deep nesting hurts readability.
### Set role, format, and length
Role instructions work best when they define expertise, scope, and decision criteria. Output instructions work best when they specify sections, fields, and length limits that are easy to verify.
**Less effective:**
```text theme={null}
You are a senior engineer. Review this code and be concise.
```
**More effective:**
```text theme={null}
You are a senior backend reviewer focused on correctness, reliability, and maintainability.
Diff to review:
[diff]
Return exactly these sections:
1. Summary — 3 bullets maximum
2. Blocking issues — table with File, Risk, Recommendation
3. Non-blocking suggestions — 5 bullets maximum
Do not rewrite the entire file. Only suggest changes directly related to this diff.
```
Prefer concrete output contracts — section names, table columns, bullet limits, scope boundaries. Avoid vague asks like "be detailed" or "make it short" when the output must fit a downstream workflow.
## Long context
Token Plan models support long context windows for both input and output. Long context works best when source material is clearly delimited, indexed, and followed by a specific task.
### Place the task after the source
For long inputs, write your question or task **after** the source documents, not before. The model is more likely to keep the task in focus when it is closest to its own response.
Of all long-context techniques, placing the task at the end of the prompt has the largest single impact on answer quality.
### Index and delimit source material
**Less effective:**
```text theme={null}
Read all of this and summarize the important parts.
[very long notes, specs, meeting transcripts, and code snippets]
```
**More effective:**
```text theme={null}
Sources (oldest first):
**launch-plan** — 2026-04-12
[launch plan]
**pricing-notes** — 2026-04-18
[pricing notes]
**meeting-transcript** — 2026-04-21
[meeting transcript]
Task: produce an executive brief for the launch owner. If sources conflict, prefer the newest dated source and call out the conflict.
Output format:
- Decision summary — 5 bullets maximum
- Risks — table with source references
- Open questions — owner, blocker, next action
```
For very large inputs, ask the model to quote or summarize the relevant parts of each document before answering. Grounding in quotes cuts noise and makes the final answer easier to verify.
## Tool use
Token Plan models support tool calling. Strong tool-use prompts define when tools should be used, when they should not be, and how tool results should be combined into the final answer.
### Tool definitions
Define each tool with a clear name, purpose, inputs, return shape, and failure behavior. The model should understand the tool contract before it decides to call the tool.
**Less effective:**
```text theme={null}
Use search when needed.
```
**More effective:**
```text theme={null}
Tool: search_docs
Purpose: search internal documentation for factual product or policy details.
Use when:
- The user asks about current product behavior, limits, pricing, or release notes.
- You need a source before making a claim that may change over time.
Do not use when:
- The user asks only for rewriting, formatting, or brainstorming.
- The answer is already fully supported by the provided context.
Arguments:
- query: concise keyword query
- product_area: optional product or feature area
Return: a list of results with title, URL, date, and snippet.
Failure: if two searches fail, stop retrying and explain what could not be verified.
```
### Parallel tool calls
Tell the model to parallelize independent tool calls. Keep calls sequential only when one result determines the next query or action.
**Less effective:**
```text theme={null}
Check the docs, the issue tracker, and the changelog, then tell me whether this bug is already fixed.
```
**More effective:**
```text theme={null}
Check these independent sources in parallel:
- documentation search — current expected behavior
- issue tracker search — matching bug reports
- changelog search — recent fixes
After all results return, answer:
- Is the bug already fixed?
- Which source supports that conclusion?
- What should the user do next?
```
Use parallel calls for independent read-only lookups. Use sequential calls for workflows like "find the customer, then update that customer's record."
### Avoid overeagerness
In agentic workflows, set clear stopping rules. The model should use tools when they materially improve the answer, not just to appear busy.
**Less effective:**
```text theme={null}
Use any available tools to solve the task.
```
**More effective:**
```text theme={null}
Use tools only when they materially improve the answer.
Rules:
- Answer directly when the question is conceptual or based only on provided context.
- Search before making claims about current prices, releases, incidents, or policies.
- Ask for confirmation before destructive actions, purchases, messages, or external writes.
- If a tool fails twice, stop retrying and explain the blocker.
- Keep tool arguments minimal and specific.
```
## Thinking and reasoning
### Control reasoning depth
Ask for deeper analysis when the task involves planning, debugging, tradeoffs, or long-horizon execution. Ask for a direct answer when the task is extraction, rewriting, or formatting.
**Less effective:**
```text theme={null}
Think step by step for every request, then answer.
```
**More effective:**
```text theme={null}
Use deeper reasoning for this migration plan.
First analyze:
- compatibility risks
- data migration order
- rollback strategy
- tests that must pass before release
Then return only the final plan:
1. Recommended approach
2. Key risks and mitigations
3. Release checklist
4. Open questions
Keep the reasoning concise in the final answer. Do not include hidden chain-of-thought or unrelated exploration.
```
For simple requests, be explicit that no deep analysis is needed:
```text theme={null}
Extract the company names from the text below. Return a JSON array only. No explanation.
```
### Reduce hallucinations
For tasks where the model might invent facts — citations, API references, version-specific behavior, customer data — give it explicit permission to refuse and provide reference material it can quote.
**Less effective:**
```text theme={null}
Answer the user's billing question.
```
**More effective:**
```text theme={null}
Answer the user's billing question using only the policies below.
Policies:
[billing policy]
If the answer cannot be supported by these policies, reply:
"I cannot confirm this from current policy — please ask billing support."
Quote the exact policy line you relied on at the end of your answer.
```
Three patterns reduce hallucinations:
* **Permission to refuse** — explicitly tell the model what to say when it does not know.
* **Reference grounding** — require the model to quote or cite the source it used.
* **Boundaries before generation** — state the allowed sources, time range, or product version before the task, not after.
## Agentic and long-task workflows
For long-running tasks, give the model a small number of active goals at a time. This helps it maintain state, track decisions, and avoid juggling too many partially related tasks in parallel.
### Single-window state tracking
The model can maintain strong task state inside one long context window. Keep the working plan, current status, and open questions visible in the prompt or project notes.
In tools that support context compression (such as Claude Code), keep system prompts concise. The model may terminate tasks early when approaching context capacity thresholds.
### Multi-window workflow
When a task naturally breaks into phases, split it across windows.
Use the first window to set up the framework, tests, and scripts. Use the next window to iterate through the remaining tasks.
Ask the model to create `tests.py` or `tests.json` to track test cases during long iterations.
Create `init.sh` to start servers and run tests, avoiding repeated setup in new windows.
Use compression for one continuous task. Start a fresh window for a new task or a major change in direction.
Ask the model to finish the current part thoroughly before moving on.
Recommended system prompt for long tasks:
```text theme={null}
This is a very lengthy task. Make full use of the available context window. Complete each part thoroughly before continuing, and avoid exhausting tokens before the task is complete.
```
## Evaluate and iterate
Treat important prompts like product configuration. Keep a small evaluation set, compare prompt versions, and record what changed.
**Less effective:**
```text theme={null}
Try a few prompt tweaks until the answer looks better.
```
**More effective:**
```text theme={null}
Prompt iteration workflow:
1. Define success criteria — correctness, format compliance, tool-use accuracy, tone.
2. Prepare 10–30 representative test cases, including edge cases.
3. Run the current prompt and the candidate prompt on the same cases.
4. Compare outputs side by side and record regressions.
5. Update the prompt only when the candidate improves the target metric without breaking required behavior.
6. Save a short changelog — what changed, why, and which cases improved.
```
This workflow helps you improve prompts without accidentally optimizing for a single impressive example.
# Quick Start
Source: https://platform.minimax.io/docs/token-plan/quickstart
Quick guide to Token Plan subscription and integration
## Getting Started
Visit [Billing > Token Plan](https://platform.minimax.io/user-center/payment/token-plan) to view your **Subscription Key**.
Important Notes:
* The Subscription Key is used for Token Plan subscriptions and purchased Credits.
* It is not interchangeable with pay-as-you-go API Keys.
* The key can exist before you have any paid resources. It becomes usable when you have an assigned Token Plan seat or Credits access.
* Please protect your API Key. We recommend exporting it as an environment variable or saving it to a config file.
Buy an individual Plus, Max, or Ultra Token Plan subscription or a Credits package in your Default Team, or use resources assigned by your Team Owner or Admin.
Quickly test **MiniMax M3** with the Claude SDK
**1. Install Claude SDK**
```bash Python theme={null}
pip install anthropic
```
```bash Node.js theme={null}
npm install @anthropic-ai/sdk
```
**2. Configure Environment Variables**
```bash theme={null}
export ANTHROPIC_BASE_URL=https://api.minimax.io/anthropic
export ANTHROPIC_API_KEY=${YOUR_API_KEY}
```
**3. Call API**
```python Python theme={null}
import anthropic
client = anthropic.Anthropic()
message = client.messages.create(
model="MiniMax-M3",
max_tokens=1000,
system="You are a helpful assistant.",
messages=[
{
"role": "user",
"content": [
{
"type": "text",
"text": "Hi, how are you?"
}
]
}
]
)
for block in message.content:
if block.type == "thinking":
print(f"Thinking:\n{block.thinking}\n")
elif block.type == "text":
print(f"Text:\n{block.text}\n")
```
Choose your preferred AI coding tool from the options below to experience the latest **MiniMax M-series** model capabilities
## MCP Integration
Quickly integrate **Token Plan MCP** for **Web Search** capability
Learn how to configure and use Token Plan MCP
## Learn More
View subscription and Credits rules.
Review common questions on usage, billing, switching, and refunds.
## Best Practices
Quickly view MiniMax Token Plan prompting patterns and practical examples
Master prompt templates, tool-use patterns, and long-context workflows for Token Plan models
Build Agents with M-series Models
# TRAE
Source: https://platform.minimax.io/docs/token-plan/trae
Use the latest MiniMax M-series models for AI programming in TRAE.
[**TRAE**](https://www.trae.ai) is ByteDance's AI-native IDE with intelligent collaboration and agent automation.
## Install and Launch TRAE
Go to [TRAE's website](https://www.trae.ai/?utm_source=content\&utm_medium=doc_minimax\&utm_campaign=minimax) to install TRAE
Click TRAE's icon to launch it. The following screen appears at TRAE's first launch
Click the Get Started button, TRAE's setup begins
For detailed installation steps, please refer to: [Trae Setup Guide](https://docs.trae.ai/ide/set-up-trae?_lang=en)
## Configure MiniMax API
**Important: Clear OpenAI Environment Variables Before Configuration**
Before configuring, ensure you clear the following OpenAI-related environment variables to avoid conflicts with MiniMax API:
* `OPENAI_API_KEY`
* `OPENAI_BASE_URL`
In TRAE, you can connect to MiniMax M3 model using API Keys obtained from the [MiniMax Developer Platform](https://platform.minimax.io/user-center/payment/token-plan) .
At the top right of the side chat box, click Settings icon > Models
Click the + Add Model button. The Add Model pop-up appears
Enter Configuration Details:
* Provider: Select **MiniMax-Global**
* Model: Select **MiniMax-M3**
* API Key: Input your **[MiniMax API Key](https://platform.minimax.io/user-center/payment/token-plan)**
Click the **Add Model** button

 #### Videos
Use the HTML video element for self-hosted video content:
Embed YouTube videos using iframe elements:
#### Tooltips
Example of tooltip usage:
#### Videos
Use the HTML video element for self-hosted video content:
Embed YouTube videos using iframe elements:
#### Tooltips
Example of tooltip usage:
 ```
## Embeds and HTML elements
```
## Embeds and HTML elements